Table of Contents
Export an image or video for the web
When preparing images or videos for the web, you want them to be as small as possible so they load as quickly as possible. Pixelmator Pro lets you export versions of your files optimized for the web using a range of optimization settings, reducing their file sizes. Exporting for the web removes the color profile, any unnecessary metadata, and lets you use advanced compression techniques to export files that load much faster online.
Pixelmator Pro lets you export images and videos for the web in the PNG, JPEG, GIF, WebP, SVG, and MP4 formats. In addition, you can export the same file in multiple formats or at different sizes at once. As you adjust the export options, you’ll see a live preview of how the image or video will look when exported.
Note: If you’d like to keep the metadata and other additional file information, make sure to export your image or video using the regular Export command.
Export an image for the web
Do one of the following:
- Click
 in the Pixelmator Pro
toolbar and choose Export for Web.
in the Pixelmator Pro
toolbar and choose Export for Web. - Choose File > Export for Web (from the File menu at the top of your screen).
- Choose Tools > Export for Web (from the Tools menu at the top of your screen).
- Press or + + on your keyboard.
- Click
Click Presets
 to select an export preset or choose a custom export format by changing the settings in the Format and the Scale Factor pop-up menus.
- (Optional) Customize the export options of your selected format.
- Click Export.
Tip: You can also drag and drop the thumbnail in the Export for Web section of the Tool Options pane onto the Desktop, a Finder window, or elsewhere to export one or multiple versions of the image with the current export settings.
Add an additional export format
Adding an additional export format will mean that, once you export, you will have two versions of your image exported with the chosen settings.
- Choose the Export for Web tool by doing one of the following:
- Click in the Pixelmator Pro
toolbar and choose Export for Web.
- Choose File > Export for Web (from the File menu at the top of your screen).
- Choose Tools > Export for Web (from the Tools menu at the top of your screen).
- Press or + + on your keyboard.
- Click
- Click Add Format, then click the Format pop-up menu to choose the desired format.
Note: If you add a few of the same file format, an additional number — 1, 2, 3, etc. — will be added to the extension suffix.
If you’d like to remove an export format, click ![]() next to it.
next to it.
Customize the export settings
Use the following settings to customize the image:
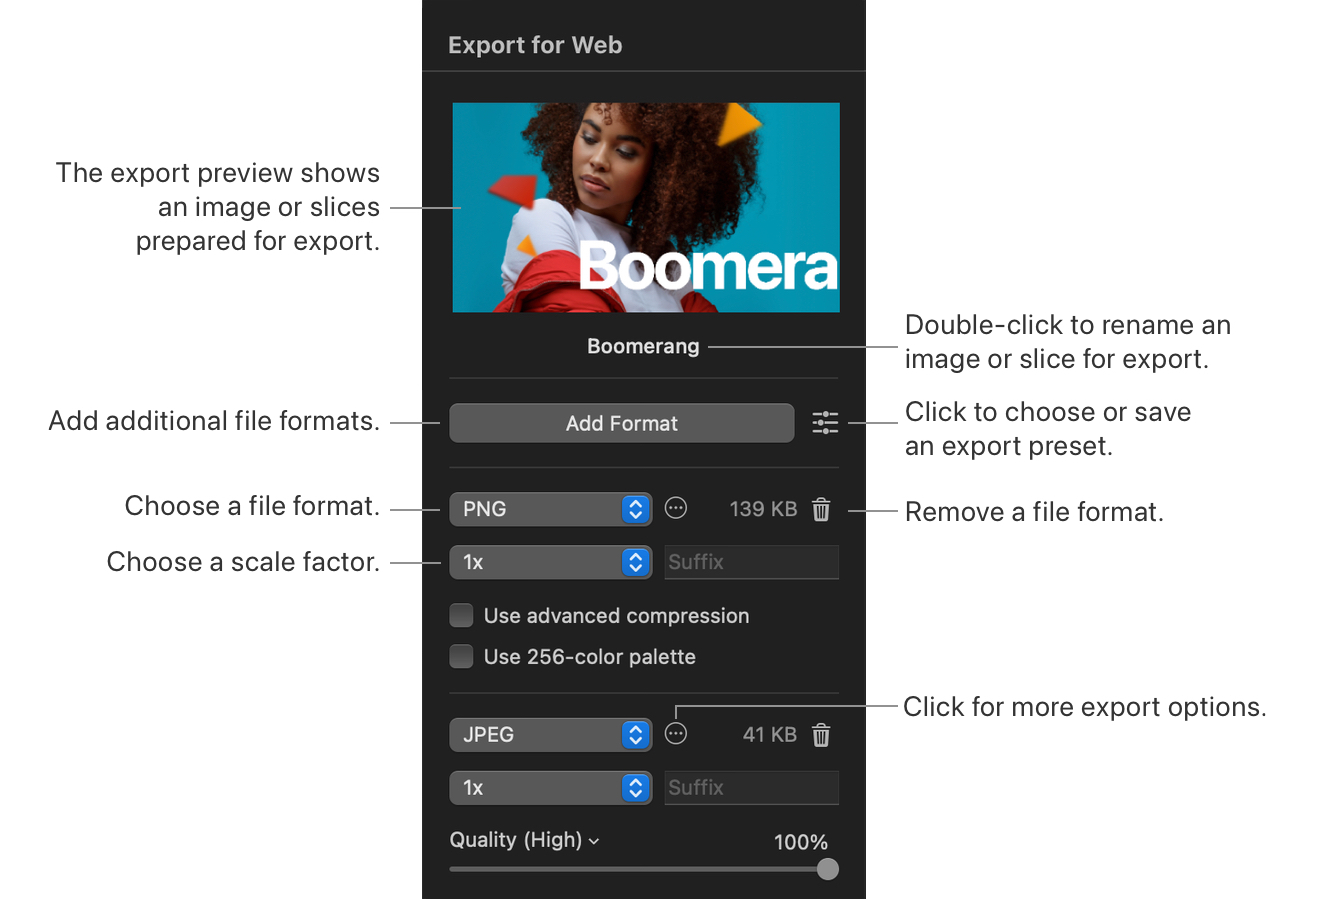
Use advanced compression (PNG). Select this option to compress the image using advanced compression algorithms. Although slightly slower, these algorithms produce smaller PNGs compared to the ones exported regularly.
Use 256-color palette (PNG). The size of a PNG image file largely depends on the number of uniquely-colored pixels in it (and how they’re arranged). The greater the number of different colors in an image — the larger the file size. To create a more lightweight image for the web, you can reduce it to only 256 colors in total. Pixelmator Pro additionally manipulates (dithers) pixels to simulate a greater color depth, so images optimized this way won’t look posterized or flat.
Keep transparency (PNG and GIF). This option is selected by default for the file formats supporting transparency. You can deselect this setting in the More
 menu to export images with all transparent areas filled with solid white.
Convert to sRGB (PNG, JPG, GIF, and WebP). Certain color profiles can make the image colors look dull or faded when displayed on the web. To avoid this, Pixelmator Pro converts the image color profile to sRGB and removes any previous color profile. If you need to keep the original file format, you can deselect this option in the More
menu.Quality (JPG, WebP). Drag the quality slider or click the Quality pop-up menu to reduce the size of an image by increasing the level of compression. Note that higher levels of compression can potentially reduce the image quality, but exporting between 75% to 85% quality can greatly reduce the image size without any noticeable drop in quality.
Use scale factors to export a scaled version of your image
By default, images exported for the web are exported at 1x, which means they are exported at the original size of the image you created. When preparing images to be displayed on high-resolution displays such as Retina, in addition to regular displays, you'll need to make sure the Retina image is twice as large as the standard image. This is due to the fact that higher resolution displays usually have at least twice as many pixels. Scale factors let you export a version of your image that is scaled up or down.
Choose the Export for Web tool by doing one of the following:
- Click in the Pixelmator Pro
toolbar and choose Export for Web.
- Choose File > Export for Web (from the File menu at the top of your screen).
- Choose Tools > Export for Web (from the Tools menu at the top of your screen).
- Press or + + on your keyboard.
- Click
Choose a scale factor from the Scale Factor pop-up menu.
Note: If your image contains vector and text elements only, you can work on the standard size of the image first and export a 2x version for Retina displays later. If the image has any raster (image) layers, you'll need to work on the Retina version first and export a 0.5x version of the image for standard displays to make sure every detail remains sharp.
Hide or show the optimized export preview
The optimized preview is only visible when using the Export for Web or Slice tools. It simulates how the image will look when exported.
Choose the Export for Web tool by doing one of the following:
- Click in the Pixelmator Pro
toolbar and choose Export for Web.
- Choose File > Export for Web (from the File menu at the top of your screen).
- Choose Tools > Export for Web (from the Tools menu at the top of your screen).
- Press or + + on your keyboard.
- Click
– click the image and choose Hide Optimized Preview or Show Optimized Preview.

