Table of Contents
Set general settings
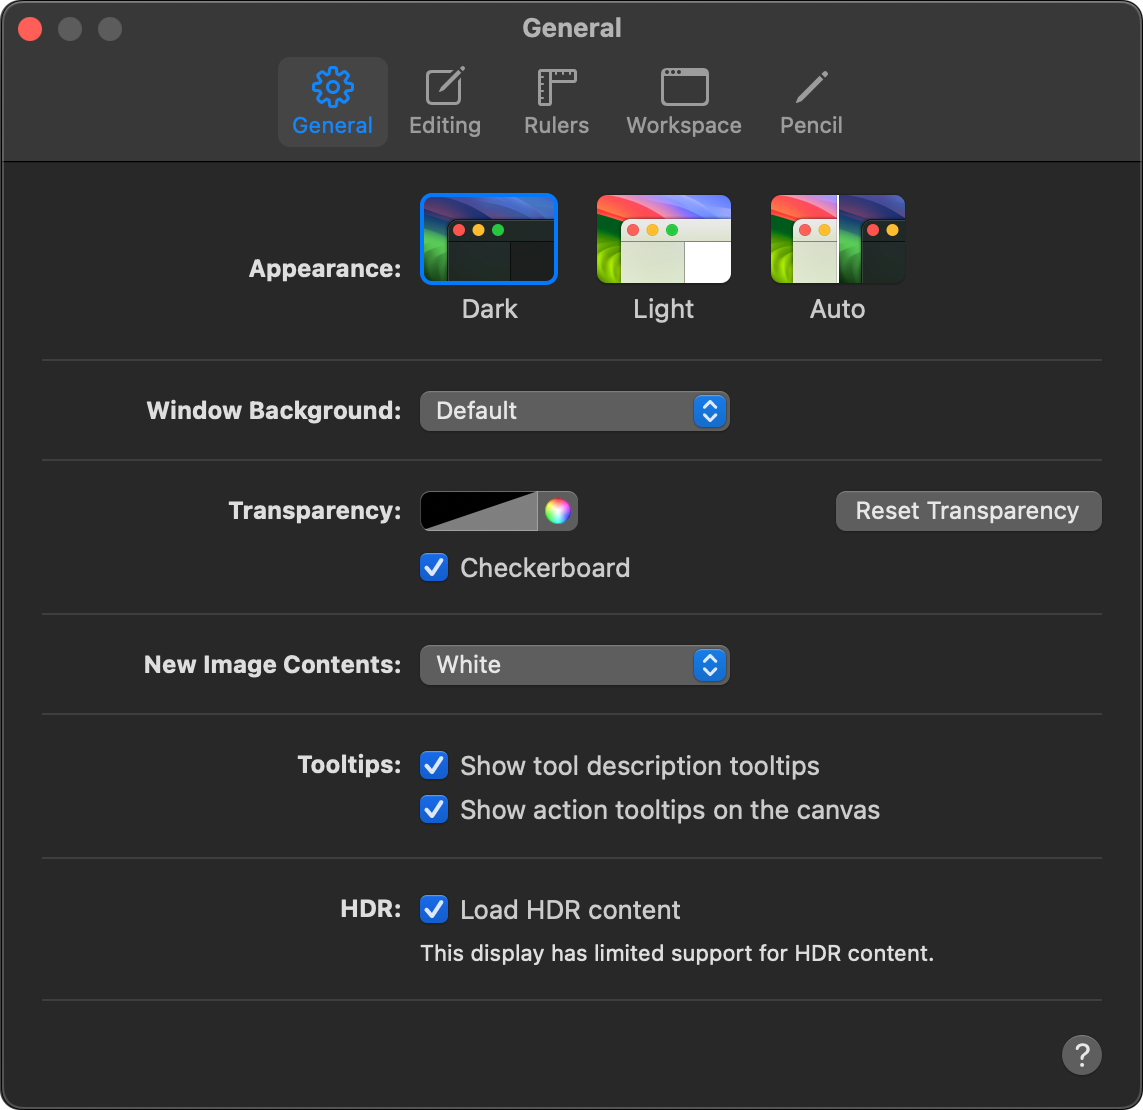
In the General tab, you can control different features of Pixelmator Pro — from the way the application and its elements look, to how it displays documents. You can also turn things like action tooltips, information labels, and HDR content loading on or off.
Change Pixelmator Pro appearance
You can work with Pixelmator Pro in light or dark mode. Pixelmator Pro can also adapt to your macOS appearance automatically.
To switch between light and dark appearances:
- Choose Pixelmator Pro > Settings (from the Pixelmator Pro menu at the top of your screen).
- In the General tab, do one of the following:
- Click the thumbnail of your preferred appearance to select it.
- Select "Set appearance automatically" to set Pixelmator Pro appearance according to the current macOS appearance.
Note: This feature is available on macOS Mojave and later.
Customize the background of the Pixelmator Pro application window
You can change the background color of the Pixelmator Pro application window. Doing this can make it easier to work with documents that might have the same background color as the window background.
- Choose Pixelmator Pro > Settings (from the Pixelmator Pro menu at the top of your screen).
In the General tab, do one of the following:
- Click the Window Background pop-up menu and choose Higher Contrast.
- Click the color well next to the Window Background pop-up menu to pick a custom background color.
To reset the background color to default, click the Window Background pop-up menu and choose Default.
Customize the transparency grid
The checkerboard grid indicates transparency in an image. In Pixelmator Pro, you can change the color of this grid, adjust its brightness and opacity, or turn off the checkerboard completely.
To customize the transparency grid:
- Choose Pixelmator Pro > Settings (from the Pixelmator Pro menu at the top of your screen).
In the General tab, do any of the following:
- Click the Transparency color well and pick a color.
- Deselect "Checkerboard" to view transparency in an image as a solid color.
To reset the transparency to default, click Reset Transparency.
Choose the default contents of a new, empty image
When you create a new image in Pixelmator Pro, a background layer is automatically added for you. You can choose it to be black, white, or transparent.
- Choose Pixelmator Pro > Settings (from the Pixelmator Pro menu at the top of your screen).
- In the General tab, click the New Image Contents pop-up menu and choose White, Black, or Transparent.
Hide or show tooltips
When you hover a pointer over a tool in the tools sidebar, you can see illustrated tool descriptions along with the links to the dedicated User Guide articles. Tooltips can also accompany actions such as Undo, Redo, Cut, or Paste. Such tooltips show up directly on the canvas as you perform an action.
- Choose Pixelmator Pro > Settings (from the Pixelmator Pro menu at the top of your screen).
- In the General tab, do any of the following:
- Select or deselect "Show tool description tooltips" to show or hide the tool descriptions.
- Select or deselect "Show action tooltips on the canvas" to show or hide the information labels.
Turn HDR content loading on and off
HDR makes your photos and videos look more vivid and life-like by showing more colors and details, especially in bright and dark areas. To work with HDR content in Pixelmator Pro, you need an HDR-compatible display and a device running macOS 14 Sonoma or later.
For a list of all compatible displays and troubleshooting tips, check out the article Working with HDR content in Photomator and Pixelmator Pro.
To always load HDR content when opening HDR photos or videos, select "Load HDR Content" in the General tab.
Here, you will also see if your display has full, limited, or no HDR support.
