Table of Contents
Working with selective adjustments
The powerful selective adjustments in Photomator allow you to select and apply color adjustments to specific areas of a photo without changing the entire image. This means you can have control over your edits and complete freedom to enhance your photos just the way you want. For example, if the sky in a photo is too bright, you can select it and reduce its brightness without making the whole photo darker.
You can use automatic adjustments that are powered by AI to select common elements in your photos — people, sky, and backgrounds — automatically. To make selections manually or create artistic effects, you can use gradient masks, choose specific color areas, or even use a brush to select which areas you'd like to edit.
To apply selective adjustments:
- Open a photo you'd like to edit.
- Tap
 to open the Color Adjustments tool.
 - Tap Add at the top of the tool options pane and choose an option:
- Adjustments. Creates a new Color Adjustments layer. You can use Adjustments layers to stack edits or experiment with alternative edit combinations.
Select Subject. Automatically selects a subject in any photo using AI.
Select Sky. Automatically selects the sky in any photo using AI.
Select Background. Automatically selects the background in any photo using AI.
Brush. Lets you make especially precise selections in photos by painting over them with a brush. Use brush controls in the Color Adjustments pane to customize the brush and paint over the areas you want to select.
Linear Gradient. Creates straight-line transitions between edited and unedited areas of a photo. You can move, rotate, resize, or change the softness of the linear gradient using on-image controls.
Radial Gradient. Creates elliptical transitions between edited and unedited areas of a photo. You can move, reshape, resize, or change the softness of the radial gradient using on-image controls.
Color Range. Lets you edit specific colors or entire color ranges in photos by selecting them using the eyedropper tool.
4. If needed, you can additionally refine the selection using blend modes to add or remove areas.
5. Once you have your selection, you can apply any of the color adjustments to the selected area.
Copying and pasting selective adjustments
Photomator currently does not support the copying and pasting of selective adjustments between photos. Adjustments can only be copied when they are applied to the base photo.
Automatically select the sky, subject, or background in a photo
In Photomator, you can quickly select specific parts of a photo, like people, backgrounds, and skies using AI and jump into editing right away. The smart AI-powered algorithm scans the photo, finds the area you want to edit, and selects it for you.
To automatically select sky, subject, or background in a photo:
- Open a photo you'd like to edit.
- Tap to open the Color Adjustments tool.
- Tap Add at the top of the Color Adjustments pane and choose Select Subject, Select Sky, or Select Background.
Note: If you'd like to add or remove some details from a selection, you can refine it. See the "Refine selections" section to learn how you can do that.
Apply linear and radial gradient selections
Use gradient masks to blend edited and unedited parts of a photo with either straight or round gradients. You can easily change the position and softness of gradients with on-image controls.
To apply a linear or gradient selection to a photo:
- Open a photo you'd like to edit.
- Tap to open the Color Adjustments tool.
- Tap Add at the top of the Color Adjustments pane and choose Linear Gradient or Radial Gradient.
- Customize the gradient:
- Reposition. Drag the blue gradient handle to move the gradient to a different area of the photo.
- Rotate. Drag the gray gradient handle in a circular motion to rotate the gradient.
- Change the Linear gradient softness. Drag the gray gradient handle directly up, down, left, or right to change the softness of the gradient.
- Change the Elliptical gradient shape. Drag any of the gray points around the radial gradient to change its shape.
Apply a brush selection
For especially precise photo selections, you can use the Brush tool to paint over desired areas. You can easily adjust the brush size, softness, and opacity to create the selection you want. If you accidentally select an area, switch to Erase mode to correct the selection.
To apply a Brush selection to a photo:
- Open a photo you'd like to edit.
- Tap to open the Color Adjustments tool.
- Tap Add at the top of the Color Adjustments pane and choose Brush.
- Customize the brush:
- Paint and Erase. Select the Paint tab to select areas in a photo or select Erase to deselect them.
- Brush Size: Drag the Brush Size slider to adjust the size of the brush.
- Softness: Drag the Softness slider to adjust the softness of the edges of the brush.
- Opacity: Drag the Opacity slider to adjust the transparency of the brush.
- Paint over the areas you want to select in a photo.
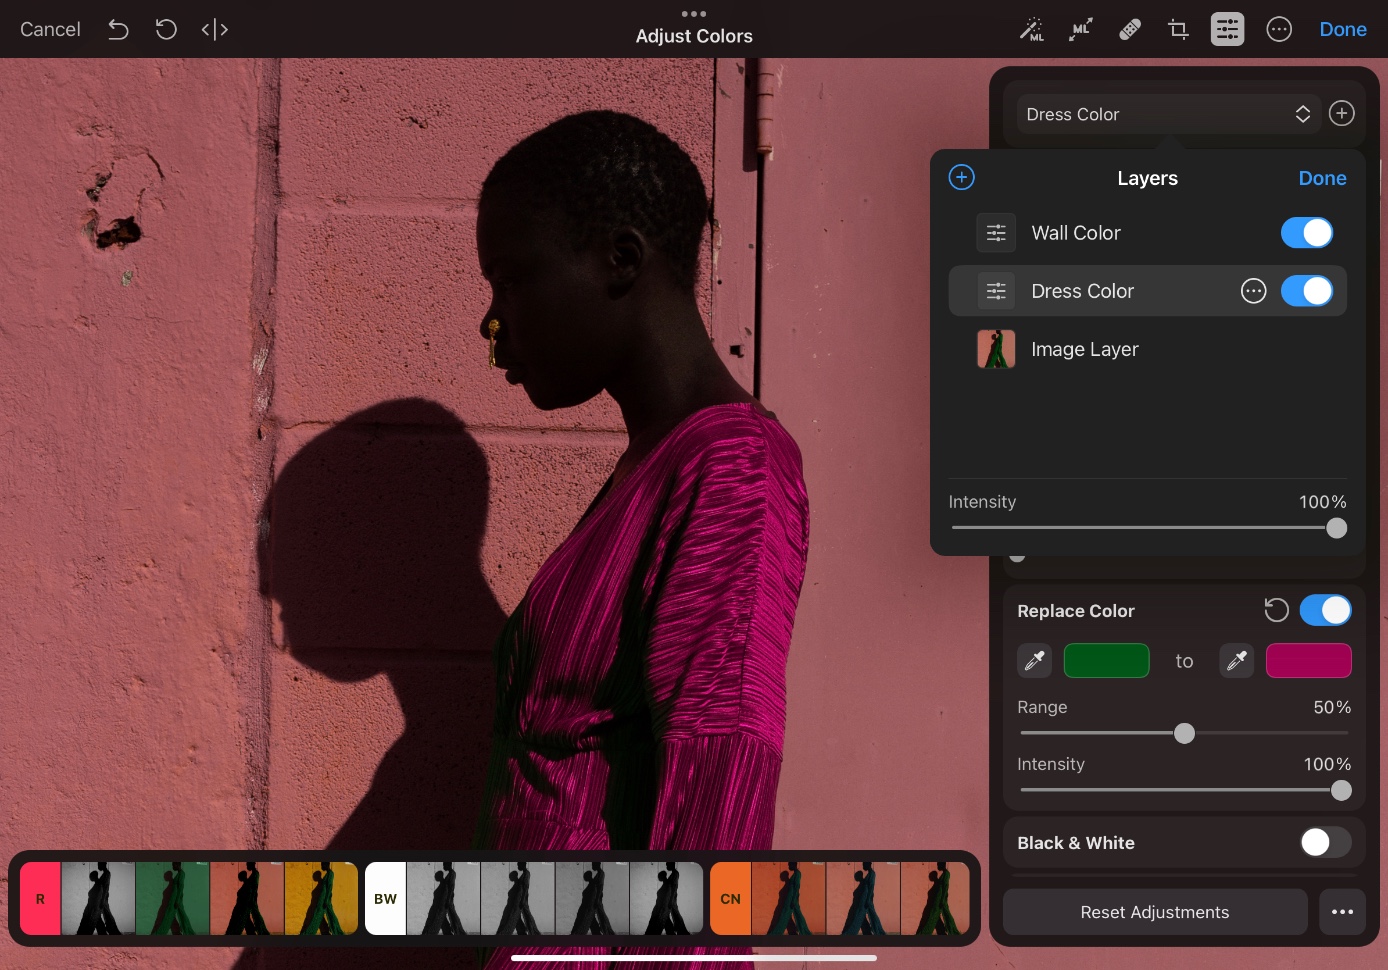
Apply color range selections
Adjust specific colors or entire color ranges in photos by selecting them using the eyedropper tool.
To select a specific color range in a photo
- Tap to open the Color Adjustments tool.
- Tap the Layers browser menu at the top of the Color Adjustments pane.
- Tap Add at the top of the Color Adjustments pane and choose Color Range.
- Drag on the photo to pick a color. If you want to reselect a color, tap
 in the color adjustments pane, or tap the color well next to it to choose a specific color to select.
 - Drag the Refine slider to refine the edges of your selection.
Add a color adjustments layer
Adjustments layers let you create a separate color adjustment layer and apply additional color adjustments on that separate layer only.
To apply an additional Adjustments layer:
- Open a photo you'd like to edit.
- Tap to open the Color Adjustments tool.
- Tap Add at the top of the Color Adjustments pane and choose Adjustments.
You can always turn the Adjustments layers on and off to see the additional adjustments or hide them. This lets you easily experiment with different edit combinations and compare them, or stack multiple variations of the same edit. For instance, to replace multiple colors in a photo, add separate Adjustments layers and use the Replace Color adjustment in each to modify different colors.
Refine selections
When you make selections in a photo, these selections show up as separate layers in the Layers browser. This helps you track your edits easily. In the Layers browser, you can also use blending modes to combine selections to refine them or create striking artistic effects.
To edit a selection:
- In the Layers browser, tap More next to the selection and choose a blending option:
- Add: Adds areas to the existing selection.
- Subtract: Removes areas from the existing selection.
- Choose how you'd like to add or remove from the selection. For instance, you can choose Brush to add or remove areas from the selection by painting over them.
Blending selections create a selection group. In this group, you can see the original selection mask, and masks of any additional selections you add to it.
Note: When you apply color adjustments to any of the selections in the selection group, the same adjustments are applied to other adjustments in that group automatically.
Rename, duplicate, invert, or rearrange selections
Selections added to a photo become individual layers in the Layers browser, so you can easily manage them and keep track of your edits. You can toggle selection layers on or off, and find options for renaming, duplicating, inverting, or rearranging them.
To delete, rearrange, rename, or move selections
- Tap to open the Color Adjustments tool.
- Tap the Layers browser menu at the top of the Color Adjustments pane.
- Tap More next to the selection you want to edit, and choose what you'd like to do with it.