I've taken the plunge and upgraded by Pixelmator software to Pro.
Loving it so far and having fun getting used to the new way of working.
I have a query though.
Has Pixelmator Pro a workaround for a Photoshop feature that allows saving of image selections for loading into same or different image?
For example, I take a lot of car images and I've been brushing away reflections on the vehicles using a mixture of clone stamp and repair tools.
Looking at various YouTube tutorials, specifically this one - https://www.youtube.com/watch?v=dDfonyIBXtI&t=483s - shows exactly the technique.
Is this possible with Pro?
Ben
Saving - Load Image Selections
2020-02-03 09:14:33

2020-02-04 16:27:24
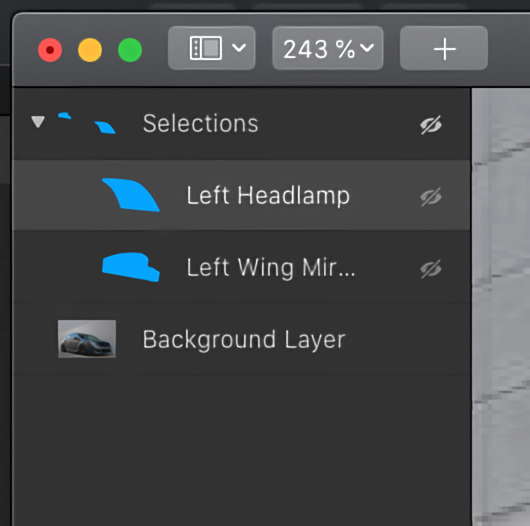
Hi Ben, if you'd like to save a selection, you could create a shape from it and add a group to your image where you'd keep all your selections. To quickly load a selection, you can Command-click the layer thumbnail in the Layers sidebar. If you add all your saved selection shapes to a group and hide the group, you'll be able to load the selections without showing the layers themselves being visible. Here's what that would look like in the Layers sidebar:
How are you making your selections, by the way, using the Free Selection tool or the Pen tool? Because if you're using the Pen tool, you'd need to make sure to add a basic color fill (100% opacity) and turn off the stroke. If you're making the selection using the Free Selection tool, you can simply Control-click the selection and choose Convert into Shape and the default options would work for you.

How are you making your selections, by the way, using the Free Selection tool or the Pen tool? Because if you're using the Pen tool, you'd need to make sure to add a basic color fill (100% opacity) and turn off the stroke. If you're making the selection using the Free Selection tool, you can simply Control-click the selection and choose Convert into Shape and the default options would work for you.
2020-02-04 20:50:34
Thanks Andrius.
Selections are made using free selection, not the Pen.
Using the pen just made a mess of my image!! Lol.
I’ll have a go at your suggestion. Cheers.
Selections are made using free selection, not the Pen.
Using the pen just made a mess of my image!! Lol.
I’ll have a go at your suggestion. Cheers.
2020-02-06 15:35:18
Yeah, the Pen tool is used to draw shapes, but after drawing one, you could make a selection from it using the Load Selection command. It's useful if you prefer drawing bezier curves or when the edges of an object are rounded/curved in various ways, like a car would be. Anyway, I'd love to hear whether my suggestions helped at all!
2020-04-06 12:26:26
Hi Andrius
I thought I'd re-visit this one given I have plenty of time in lockdown! So, looking for your help as I can't seem to replicate the actions I'm looking for.
I can make the selections OK and convert them to shapes - easy enough.
What I can't figure out is how to replicate the PS action of copying a portion of the car that has the paint finish I need into the shape/loaded selection.
It's frustrating me no end - mainly due to me lack of knowledge! Can you help?
2020-04-06 13:17:39
I've just taken another look at the video and this post and I think I've worked out what's going but I don't have enough experience with retouching cars to be sure... Basically, it looks like "pasting into" a selection creates a new layer with a mask, but the mask is not linked to the layer. For that reason, moving the content does not move the mask. Pixelmator Pro doesn't have this direct functionality but there is a pretty simple way to replicate it so I'd be grateful if you could try these steps and let me know whether they work:
1. Make a selection of the area you'll be using
2. Convert it into a shape (I assume you've already done 1 and 2 but I'm repeating them just in case)
3. Show the shape layer you'll be using (if you've previously hidden it), click it in the Layers sidebar and choose Edit > Load Selection (or simply Command-click its thumbnail), then hide it again
4. In the Layers sidebar, click to select the original car layer, then press the Command-C and command V keyboard shortcuts to copy and paste the content as a new layer (or use Edit > Copy and Edit > Paste, of course)
5. In the Layer sidebar, Control-click the newly-pasted layer and choose Group (Command-G)
6. In the Layers sidebar, Control-click the newly-created group and choose Add Mask
7. Expand the group, select the layer inside and reposition it as needed
Now, whenever you want to "paste into" again make sure to select the layer inside the group and paste inside the group. The mask will continue to do its job and you'll be able to change the position of the pasted content easily. The grouped layer hack is basically a way of creating an unlinked mask (which we do plan to add in the future, of course).
Hope that helps!
2020-04-06 13:38:45
Ta.
I’m not sure I’m doing this correctly.
Followed your instructions to the letter, but the selection I’m getting is just a copy of the selection I want to paste into.
I need videos here! Lol.
Clearly I’m doing something wrong. I’ll keep working at it.
I’m not sure I’m doing this correctly.
Followed your instructions to the letter, but the selection I’m getting is just a copy of the selection I want to paste into.
I need videos here! Lol.
Clearly I’m doing something wrong. I’ll keep working at it.
2020-04-06 13:41:37
Understood, could you maybe share a screen recording of you doing this? You can upload it to http://upload.pixelmator.com, then copy and paste the link from that page here. A recording would tell me whether the steps might be wrong or if they're right but my method doesn't quite match the one in the video.
P.S. This definitely isn't the easiest procedure, so it's understandable you're getting a little stuck...
P.S. This definitely isn't the easiest procedure, so it's understandable you're getting a little stuck...
2020-04-06 13:42:57
OK, I'll have a go.
2020-04-08 08:36:19
Any luck? 
2020-04-08 09:00:00
Hi Andrius
Yes! Figured it out - thank you! The benefits of having plenty time.
Thanks again.
Yes! Figured it out - thank you! The benefits of having plenty time.
Thanks again.
2020-04-08 10:29:52
Ah, I'm very glad to hear that!