Table of Contents
Adjust the levels of an image
The Levels adjustment lets you adjust the brightness, contrast, and tonal range of an image. These properties are determined by the distribution of shadows, highlights, and midtones, and with Levels, you can control each one separately. The Levels histogram also works as a map to show the amount of the shadows, highlights, and midtones in an image.
The shadows can be adjusted using the Black point slider. Dragging it to the right makes the dark areas of an image darker. The White point controls the highlights and makes the bright areas brighter. The Midtones slider shifts all the midtone values to make them closer to back or white. As you drag the Levels sliders to redefine, say, the black or white points, the other tones in the image are evenly redistributed, increasing the tonal range and contrast in the image.
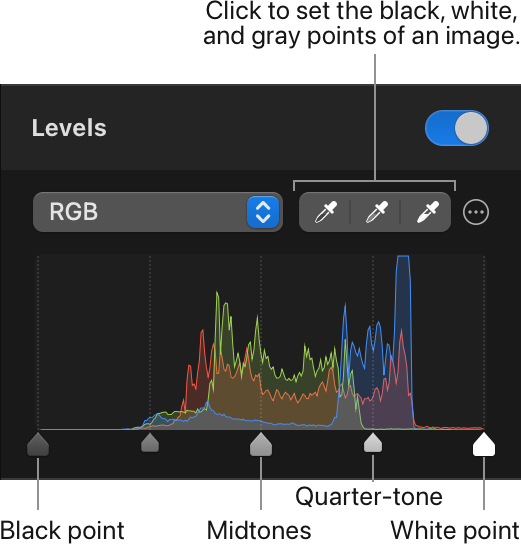
In case you need some more control, you can also use the quarter-tone sliders in-between the Black point, White point, and the Midtones.
Adjust the levels of an image
The Levels adjustment can be applied directly to a single layer or, using a color adjustments layer, to multiple layers in a composition.
To edit the currently selected layer, do one of the following:
- Choose Format > Color Adjustments > Levels (from the Format menu at the top of your screen).
- In the Tools sidebar, click
 and turn on the Levels adjustment.
 - Press on your keyboard and turn on the Levels adjustment.
- Press + on your keyboard.
To edit multiple layers in a composition using a color adjustments layer (all layers below this layer will be affected):
- Choose Insert > Color Adjustments (from the Insert menu at the top of your screen) and turn on the Levels adjustment in the Tool Options pane.
- Click
 at the top of the
Layers sidebar, choose Color Adjustments, and turn on the Levels adjustment.
at the top of the
Layers sidebar, choose Color Adjustments, and turn on the Levels adjustment. - Press + + on your keyboard, and turn on the Levels adjustment.
Note: If the adjustment isn't visible, you can turn it on from the Customize menu at the bottom of the Color Adjustments pane.
Manually adjust the levels of an image
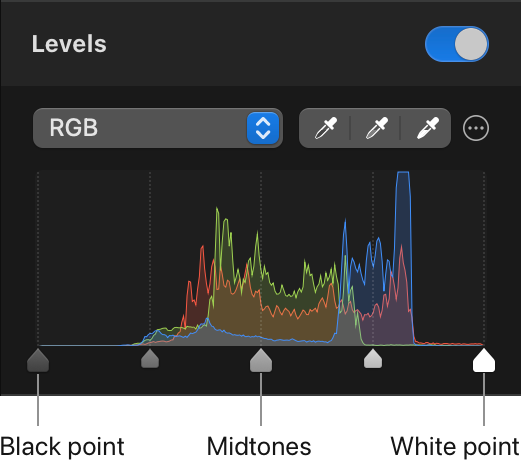
Drag the sliders below the histogram in the Levels adjustment to manually adjust the levels of an image.
Black point: Dragging the black point slider redefines the black point in the image. If your image has gray shadows that you’d like to be closer to black, you can drag the black point to the right. The rest of the tonal values in the image will be evenly redistributed, increasing the overall contrast in the image.
Gray point: Dragging the gray point slider redefines the gray point in the image. This slider can be dragged in two directions — when you drag it to the right, you specify that a tone brighter than the current gray point becomes the new gray point. This darkens the image but affects the midtones more and doesn’t have such a strong effect on the dark blacks and bright whites. Dragging it to the left brightens the image, again affecting the midtones (and lighter shadows/darker highlights) more than the pure blacks and whites.
White point: Dragging the white point slider redefines the white point in the image. If your image has somewhat dark highlights that you’d like to be closer to white, you can drag the white point to the left. The rest of the tonal values in the image will be evenly redistributed, increasing the overall contrast and brightness of the image.
Quarter-tone: Dragging these sliders affects only the tones between either the shadows and midtones, or midtones and highlights, without affecting the other tones.
Important: If you clip too far into either the black or white tonal values, tonal values that were originally near pure black and pure white are now changed to pure black and pure white, resulting in lost image detail.
Show Original: Click the Show Original button or press + on your keyboard to see what the image looks like without any color adjustments.
Show Split Comparison: -click the Show Original button, press + on your keyboard, or force click the canvas.
To reset all Color Adjustments, click Reset at the bottom of the Color Adjustments pane.
Automatically adjust the levels of an image to improve contrast
Auto Contrast adjusts the Luminance channel to improve brightness and contrast.
- Click the More
 and choose Auto Contrast.
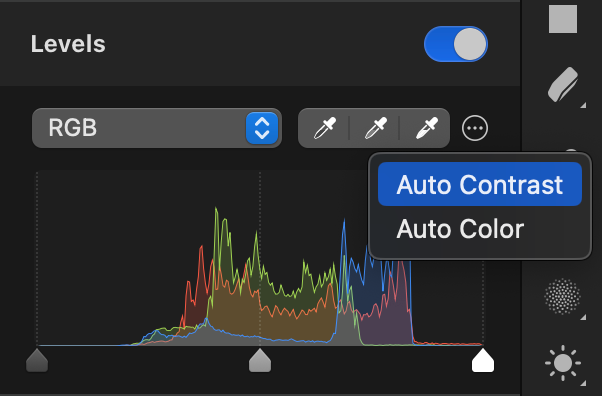
To fine-tune the automatic contrast improvements, click the Levels pop-up menu in the Tool Options pane and choose Luminance, then drag the sliders in the Luminance channel of the Levels adjustments.
Show Original: Click the Show Original button or press + on your keyboard to see what the image looks like without any color adjustments.
Show Split Comparison: -click the Show Original button, press + on your keyboard, or force click the canvas.
To reset all Color Adjustments, click Reset at the bottom of the Color Adjustments pane.
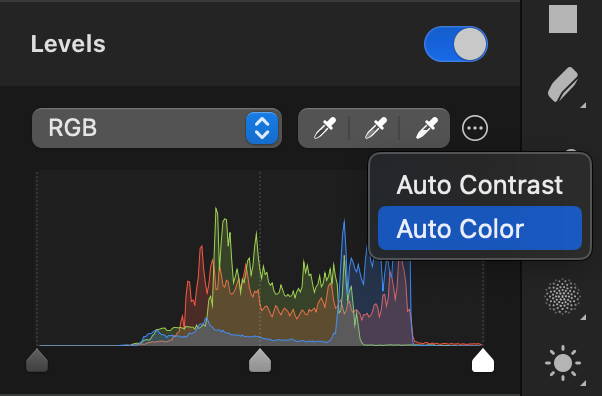
Automatically adjust the levels of an image to improve colors
Auto Color adjusts each of the Red, Green, and Blue channels to improve colors.
- Click the More menu in the
Tool Options pane and choose Auto Color.
To fine-tune the automatic color improvements, click the Levels pop-up menu in the Tool Options pane and choose Red, Green, or Blue, then drag the sliders in the Red, Green, or Blue channels of the Levels adjustments.
Show Original: Click the Show Original button or press + on your keyboard to see what the image looks like without any color adjustments.
Show Split Comparison: -click the Show Original button, press + on your keyboard, or force click the canvas.
To reset all Color Adjustments, click Reset at the bottom of the Color Adjustments pane.
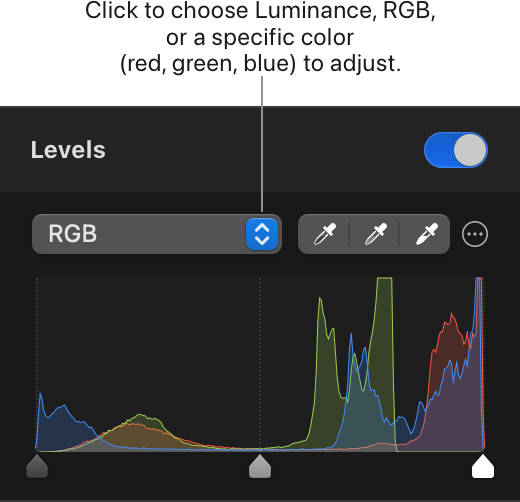
Change the channel in which to adjust levels
The Levels adjustment includes five channels that you can edit — RGB, Luminance, Red, Green, and Blue — and each one lets you edit your image in a different way.
- RGB lets you adjust all the colors that make up every photo together.
- Luminance adds a way to adjust tones without changing the perceived saturation of colors.
- The Red, Green, and Blue channels let you individually edit each of the colors that make up a digital image.
Click the Levels pop-up menu in the Tool Options pane and choose RGB, Luminance, Red, Green, or Blue.