Table of Contents
Working with color adjustments
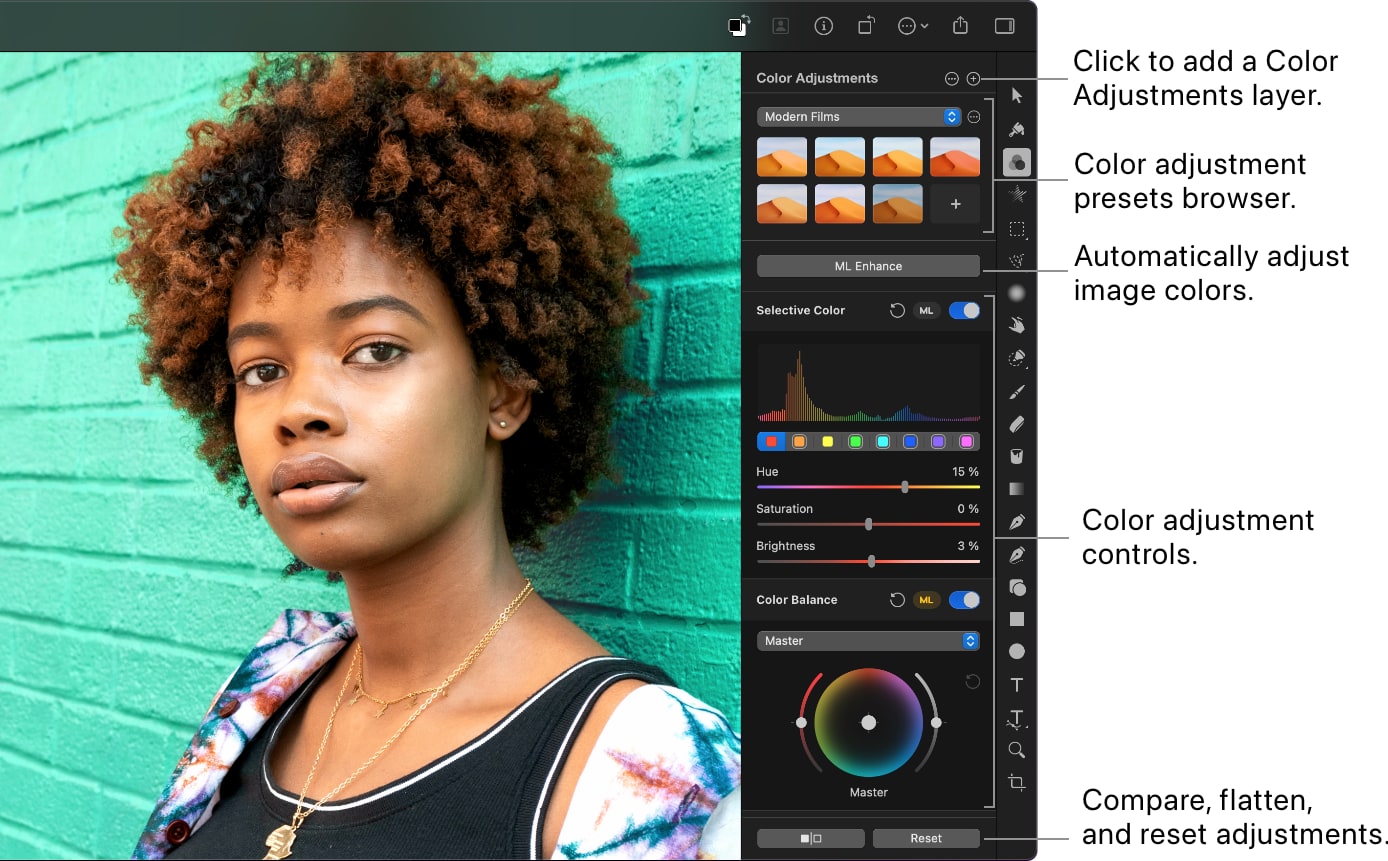
When working with color adjustments, there are a few useful things you can use to optimize your workflow. For instance, you can customize the color adjustments pane to include only the color adjustments you use, temporarily disable certain color adjustments, reset all the effects applied to a particular layer, view how a particular layer looks like without any adjustments and more.
Apply color adjustments to a single layer
You can apply color adjustments to layers directly or add them as adjustments layers. Adding adjustments directly will automatically link them with the layer to which they are applied. This means that when editing, the changes applied to the layer will also affect the color adjustments and vice versa. E.g. if you paint on an adjusted layer with a brush, the brush color may look different because the same color adjustments will reflect on it.
- In the Layers sidebar, select the layer or layer group you'd like to edit
- Do one of the following:
- Click
 in the
Tools sidebar.
in the
Tools sidebar. - Choose Tools > Color Adjustments (from the Tools menu at the top of your screen).
- Press the key on your keyboard.
- Click
- In the list of color adjustments, turn on the adjustments you want to apply.
- Edit the adjustment settings. Keep in mind that the color adjustments will affect just that one layer or layer group to which they are applied.
Tip: In Pixelmator Pro, the color adjustments have a set order in which they appear within the adjustments list and can't be rearranged. If you'd like to change the order of adjustments, you can add them as separate color adjustments layers and arrange them as needed in the Layers list.
Create color adjustments layers
Color adjustments layers work as individual elements you can add to a project and edit separately from the layer (or layers) to which they are applied. Just like the regular color adjustments, color adjustment layers offer nondestructive editing. These layers can be moved freely up or down the layers list and will change the appearance of all layers below them. Other than that, all the color adjustment controls function the same way as they do when editing layers directly.
To add a color adjustments layer, do any of the following:
- Choose Insert > Color Adjustments (from the Insert menu at the top of your screen).
- Click the Add
 at the top of the Color Adjustments pane.
 - Click the Insert Layer
 at the top of the Layers sidebar and choose Color Adjustments.
 - Click the Add Layer
 in the Toolbar and choose Color Adjustments.
 - Press + +
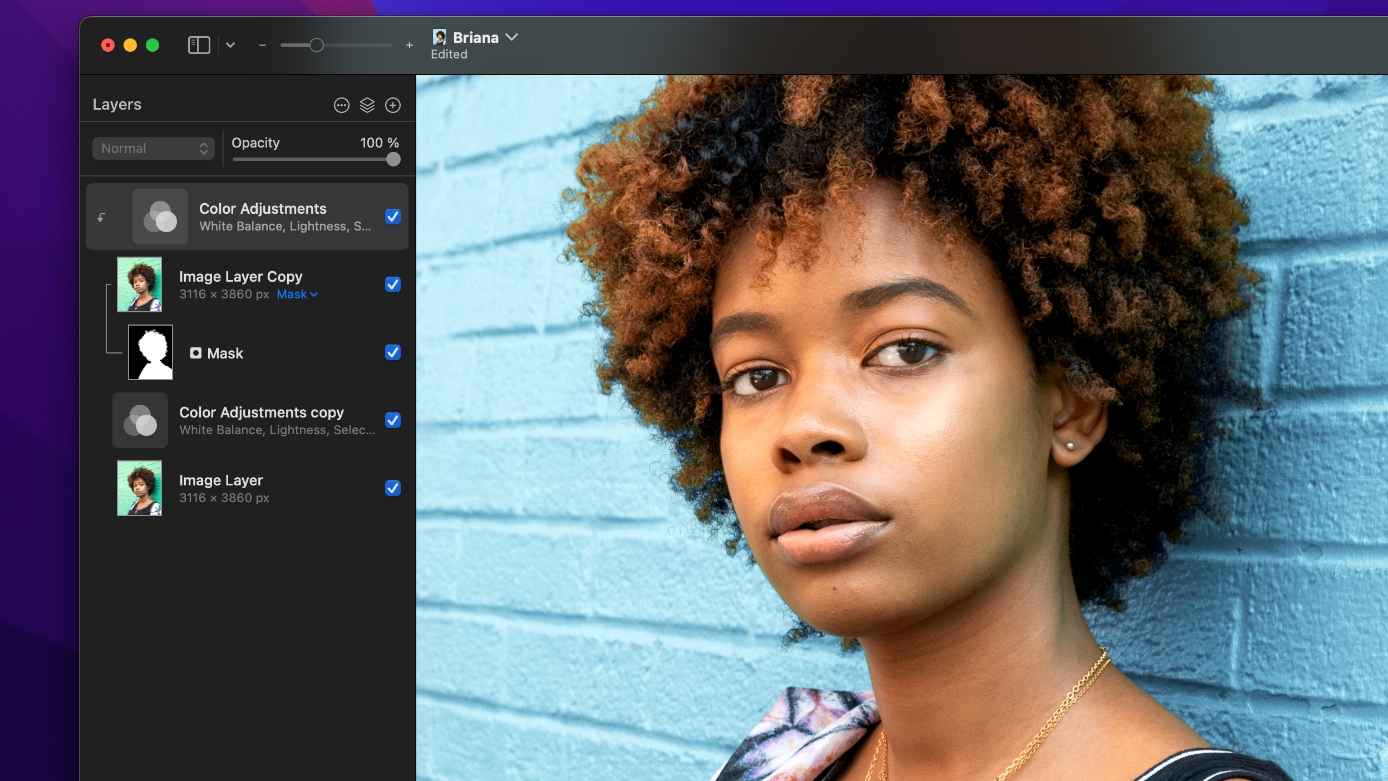
Tip: If you'd like to apply a color adjustments layer to only one layer below it, you can do that using a clipping mask. See Use clipping masks to learn more about working with clipping masks.
Add and remove color adjustments
If a certain color adjustment isn't visible in the list of adjustments, it may be turned off. To access the adjustment, you'll need to add it from the Customize menu.
Do one of the following:
- Click in the
Tools sidebar.
- Choose Tools > Color Adjustments (from the Tools menu at the top of your screen).
- Press the key on your keyboard.
- Click
Click Customize at the bottom of the list of color adjustments.
Select effects to add them or deselect them to remove them from the list of adjustments. The changes you make apply to all Pixelmator Pro documents.
Temporarily hide a single adjustment
Do one of the following:
- Click in the
Tools sidebar.
- Choose Tools > Color Adjustments (from the Tools menu at the top of your screen).
- Press the key on your keyboard.
- Click
In the Layers sidebar, click to select the layer you’d like to edit.
In the Tool Options pane, turn off the color adjustment you want to hide.
Reset all color adjustments applied to a layer
Do one of the following:
- Click in the
Tools sidebar.
- Choose Tools > Color Adjustments (from the Tools menu at the top of your screen).
- Press the key on your keyboard.
- Click
In the Layers sidebar, select a layer from which to remove the color adjustments.
Do one of the following:
- In the Tool Options pane, click Reset.
- Choose Format > Color Adjustments > Reset Adjustments.
Temporarily see the original layer without any adjustments
Do one of the following:
- Click in the
Tools sidebar.
- Choose Tools > Color Adjustments (from the Tools menu at the top of your screen).
- Press the key on your keyboard.
- Click
In the Layers sidebar, click to select the layer you'd like to see without the color adjustments.
Click and hold the Show Original button at the bottom of the Tool Options pane, or press + on your keyboard.
Turn on Split Comparison view
Using the Split Comparison view, you can see what an image looked like before and after you applied any color adjustments to it. There are a few ways you can turn on the Split Comparison view:
– click the Show Original button at the bottom of the Tool Options pane.
Press + on your keyboard.
If you're using a trackpad, force click the canvas or two-finger tap the canvas and choose Split Comparison.
Choose Window > Customize Toolbar and drag the Compare item to the toolbar.
Flatten color adjustments
Flattening all color adjustments applied to a layer can be useful when you’re happy with the way it looks and you’d like to resize the layer without the color adjustment affecting other layers.
Do any of the following:
In the Layers sidebar, – click a layer and choose Color Adjustments > Flatten Adjustments.
Choose Format > Color Adjustments > Flatten Adjustments (from the Format menu at the top of the screen).
– click the Reset button at the bottom of the Tool Options pane.
Export adjustments as LUT
If you have a set of color adjustments you'd like to use in apps other than Pixelmator Pro, you can save them as LUTs. See Apply LUTs in Pixelmator Pro to learn more.
- Apply the color adjustments you want to your image or select one of the color adjustment presets.
- Do one of the following:
- Choose Format > Color Adjustments > Export Adjustments as LUT (from the Format menu at the top of your screen).
- Click the More menu
 at the top of the Color Adjustments pane and choose Export Adjustments as LUT.
 - In the Tools sidebar, click
and turn on Custom LUT or add it from the Customize menu at the bottom of the Color Adjustments pane. In the More menu , click Export Adjustments as LUT.


