Reproducing the "Scanner" effect from Pixelmator in Pixelmator Pro?

Talk about Pixelmator Pro, share tips & tricks, tutorials, and other resources.
User avatar

2019-02-01 12:32:45

Hi there,

I recently switched over to Pixelmator Pro because I need to do some batch processing of hundreds of photos for a game I'm working on, and found the Automator functionality in Pixelmator Pro much more robust, since you can make Color Adjustment presets and Effects Presets and have Automator do all the busy work for you.
That said, one of the Effects I was using in Pixelmator I haven't found in Pixelmator Pro - "Scanner"

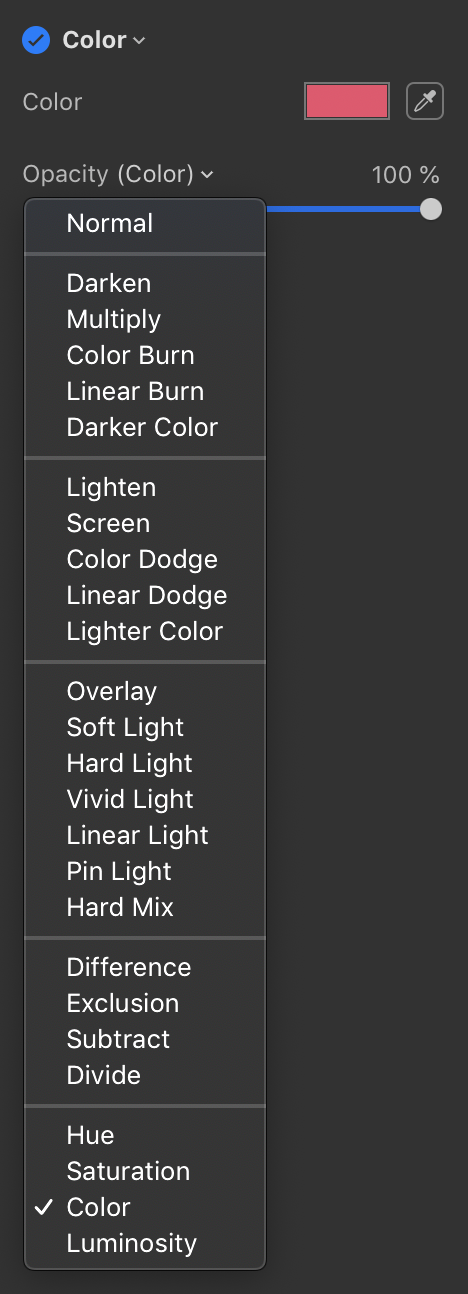
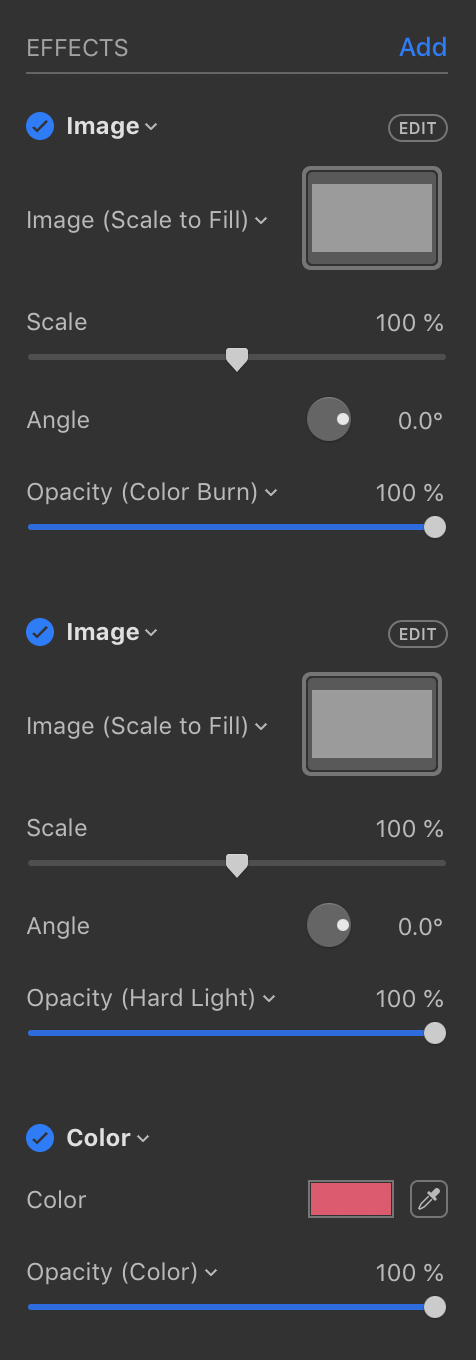
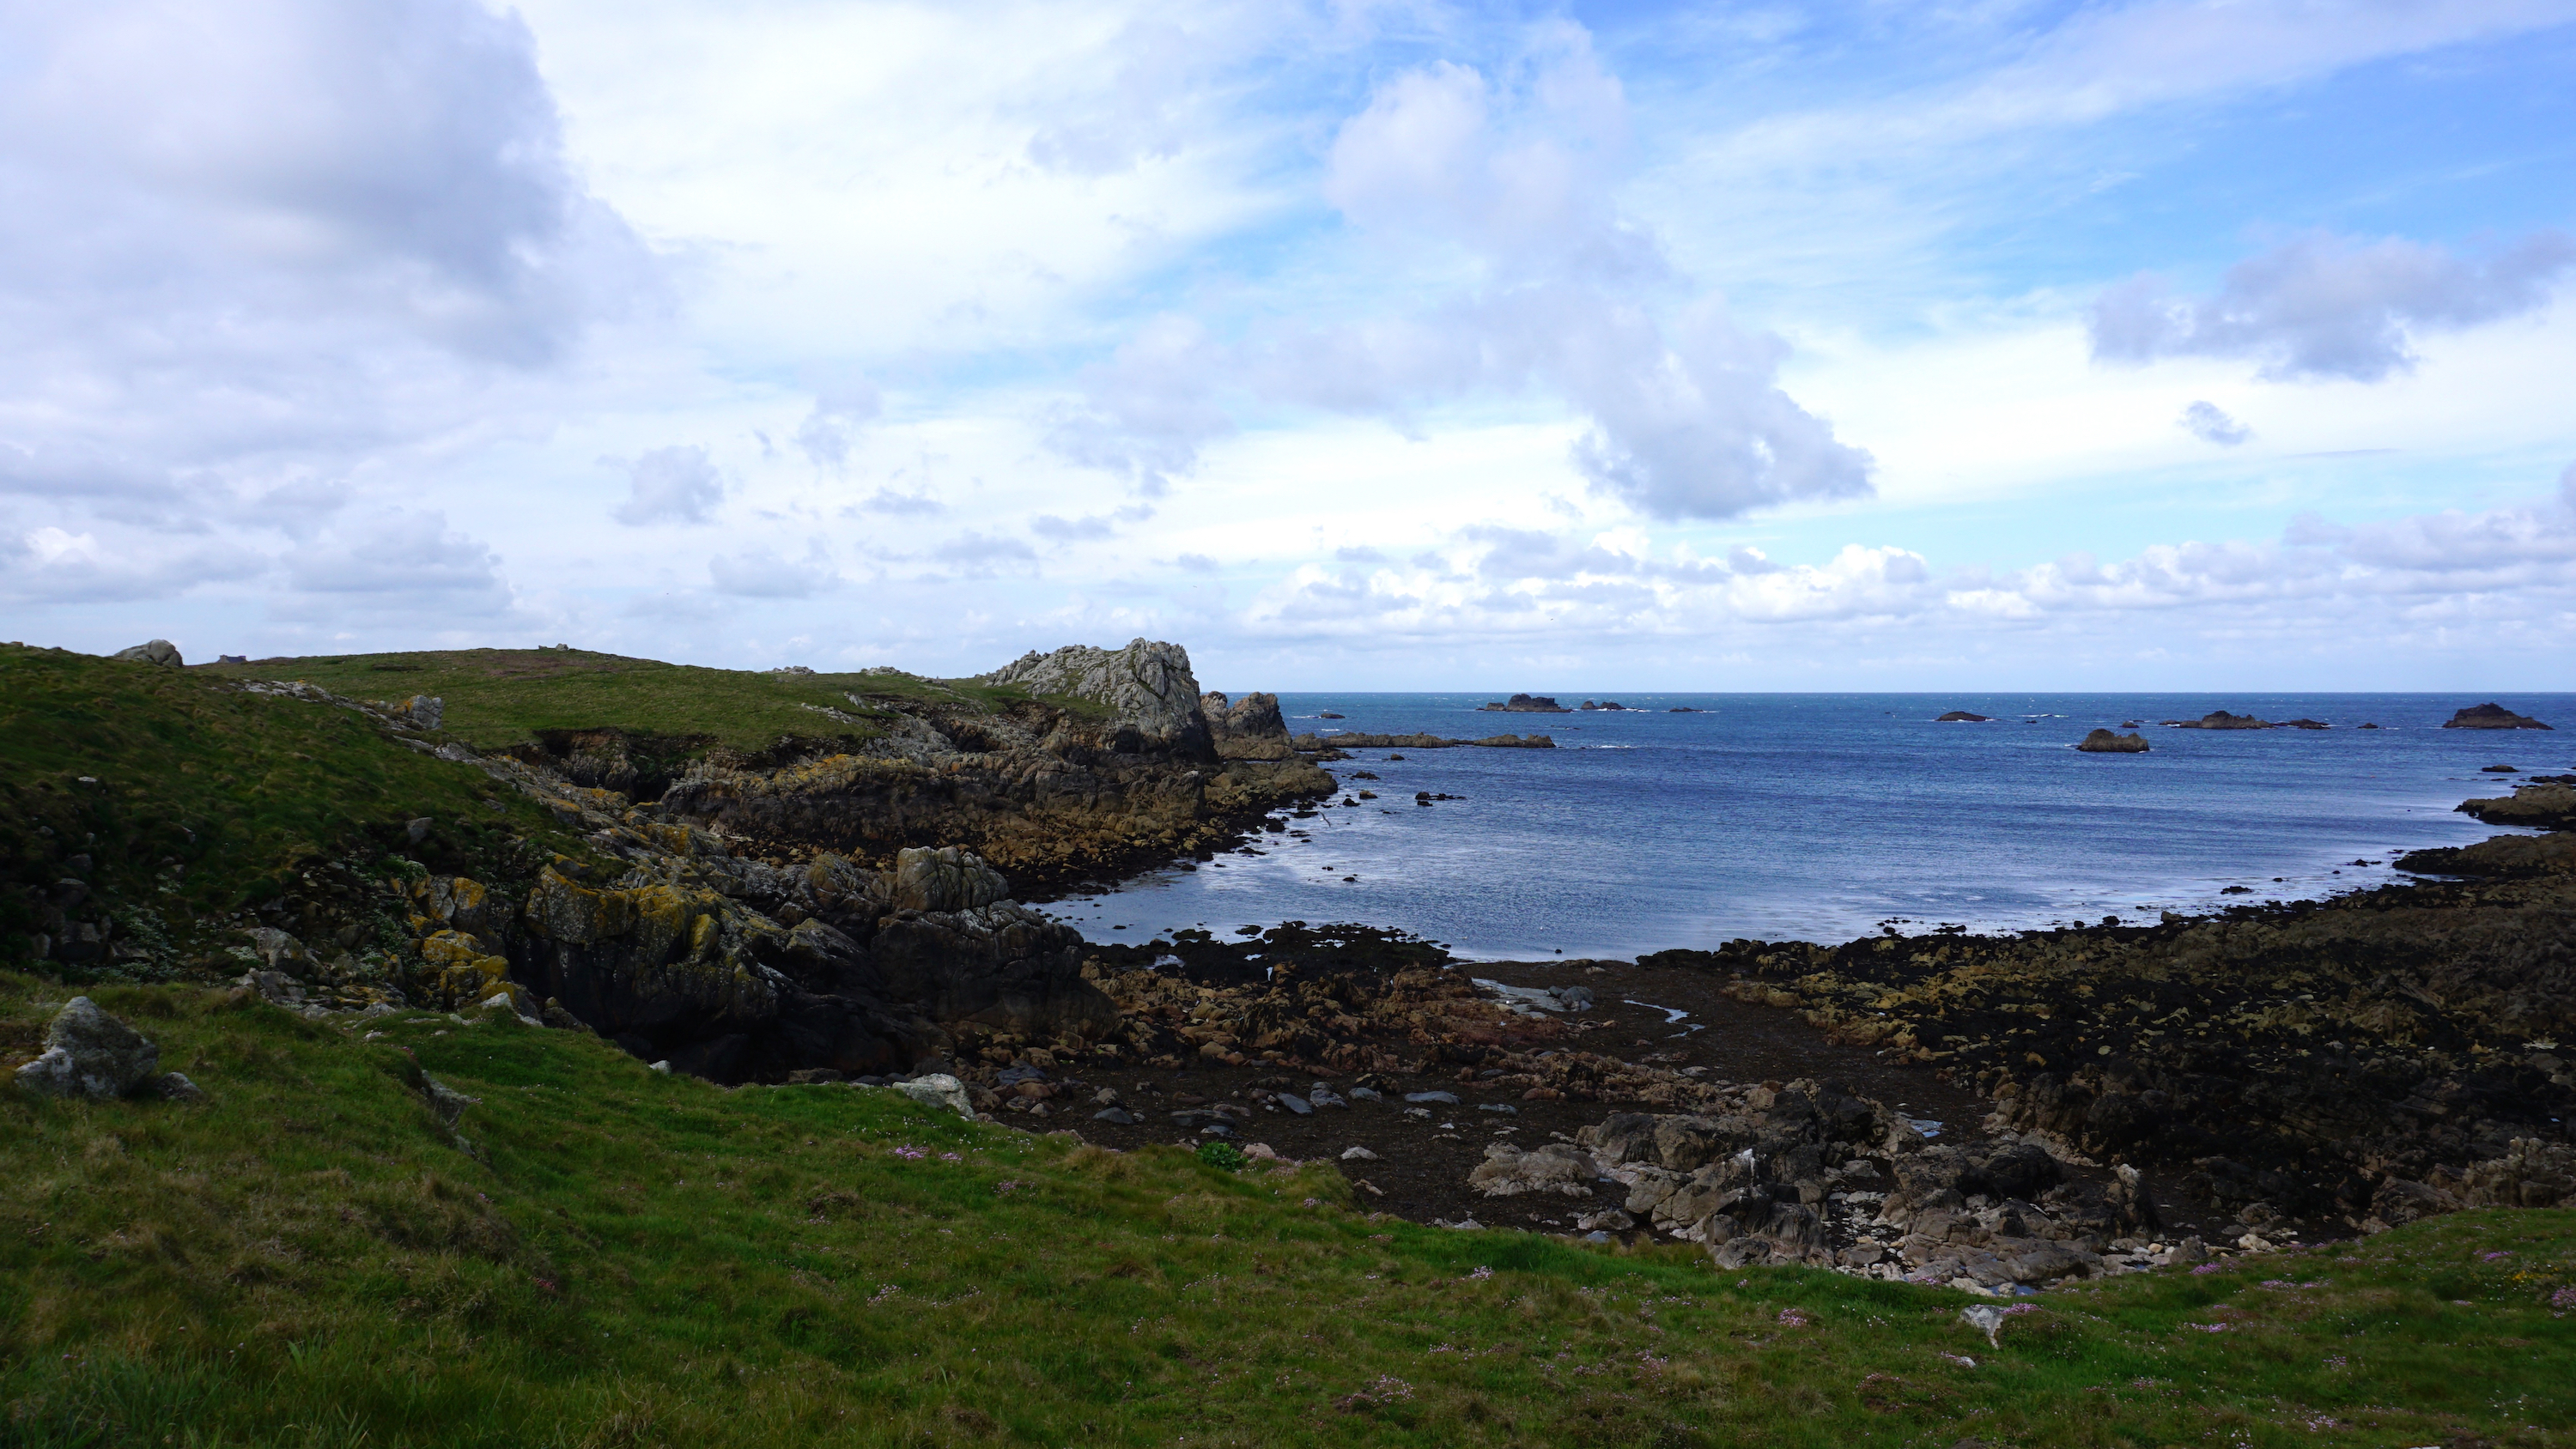
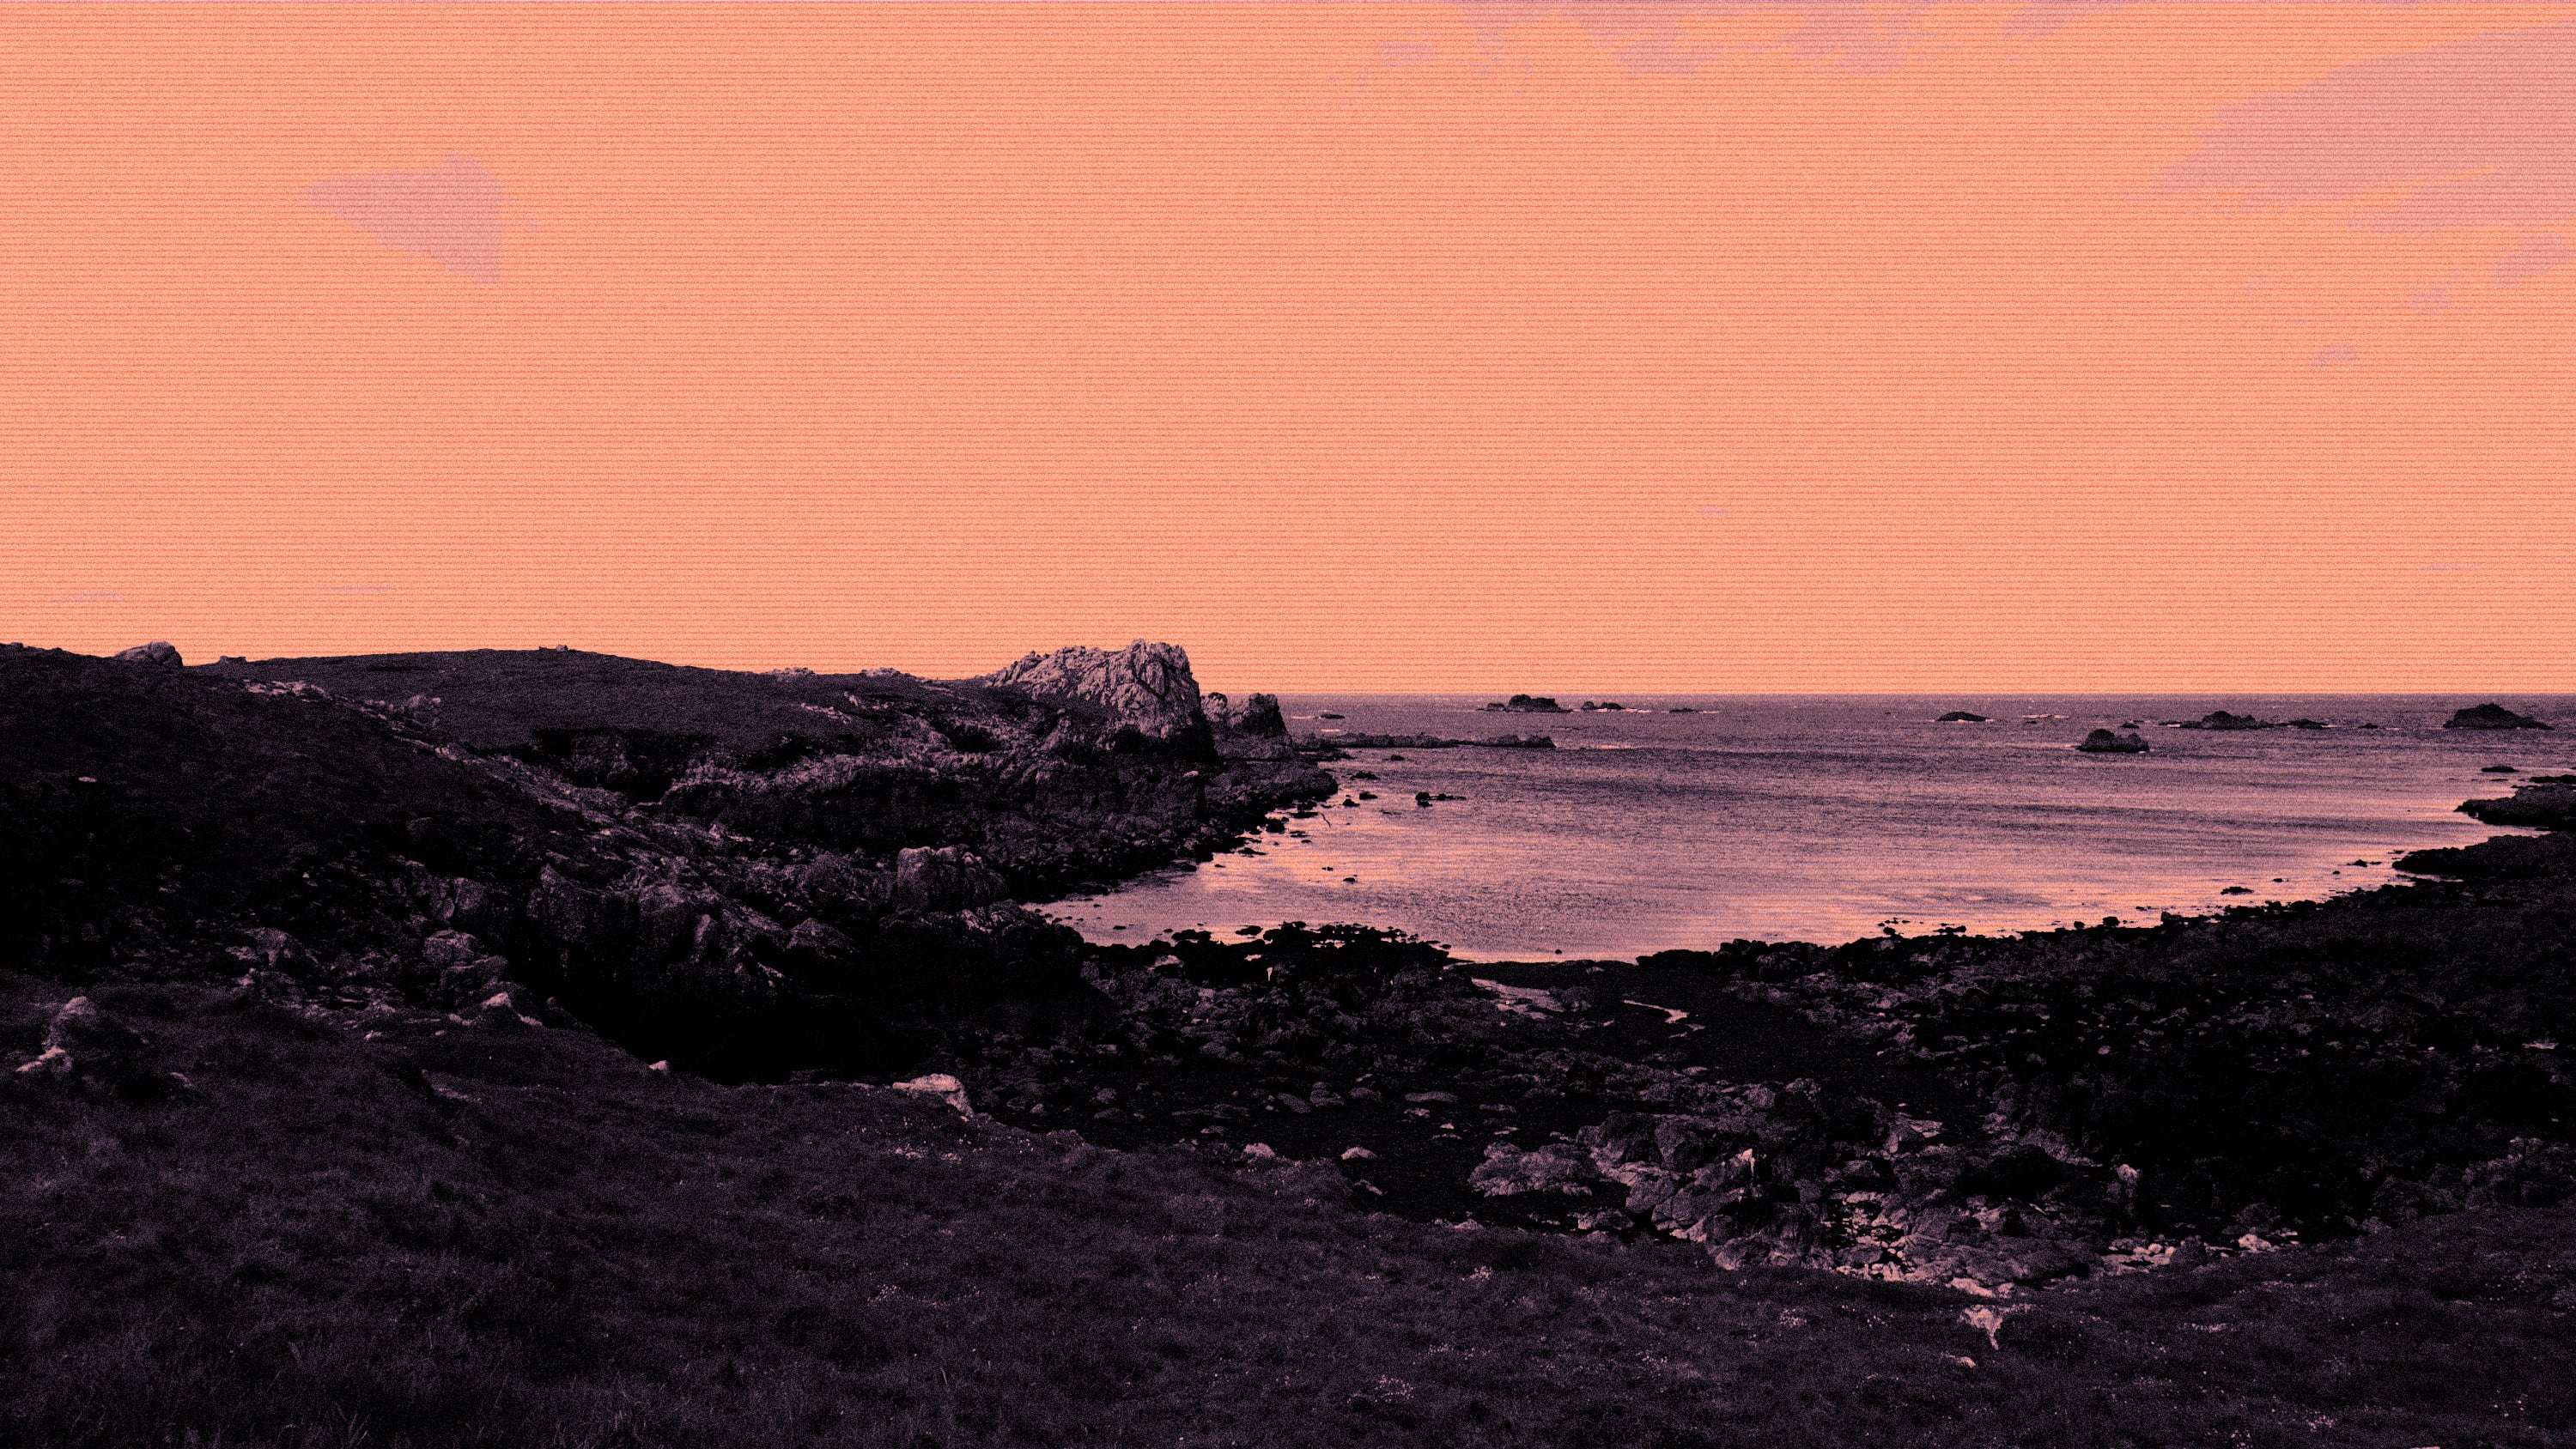
Does anyone know how to reproduce this Effect in Pixelmator Pro? If you are unfamiliar with this effect, it takes an image that looks like this:

Image

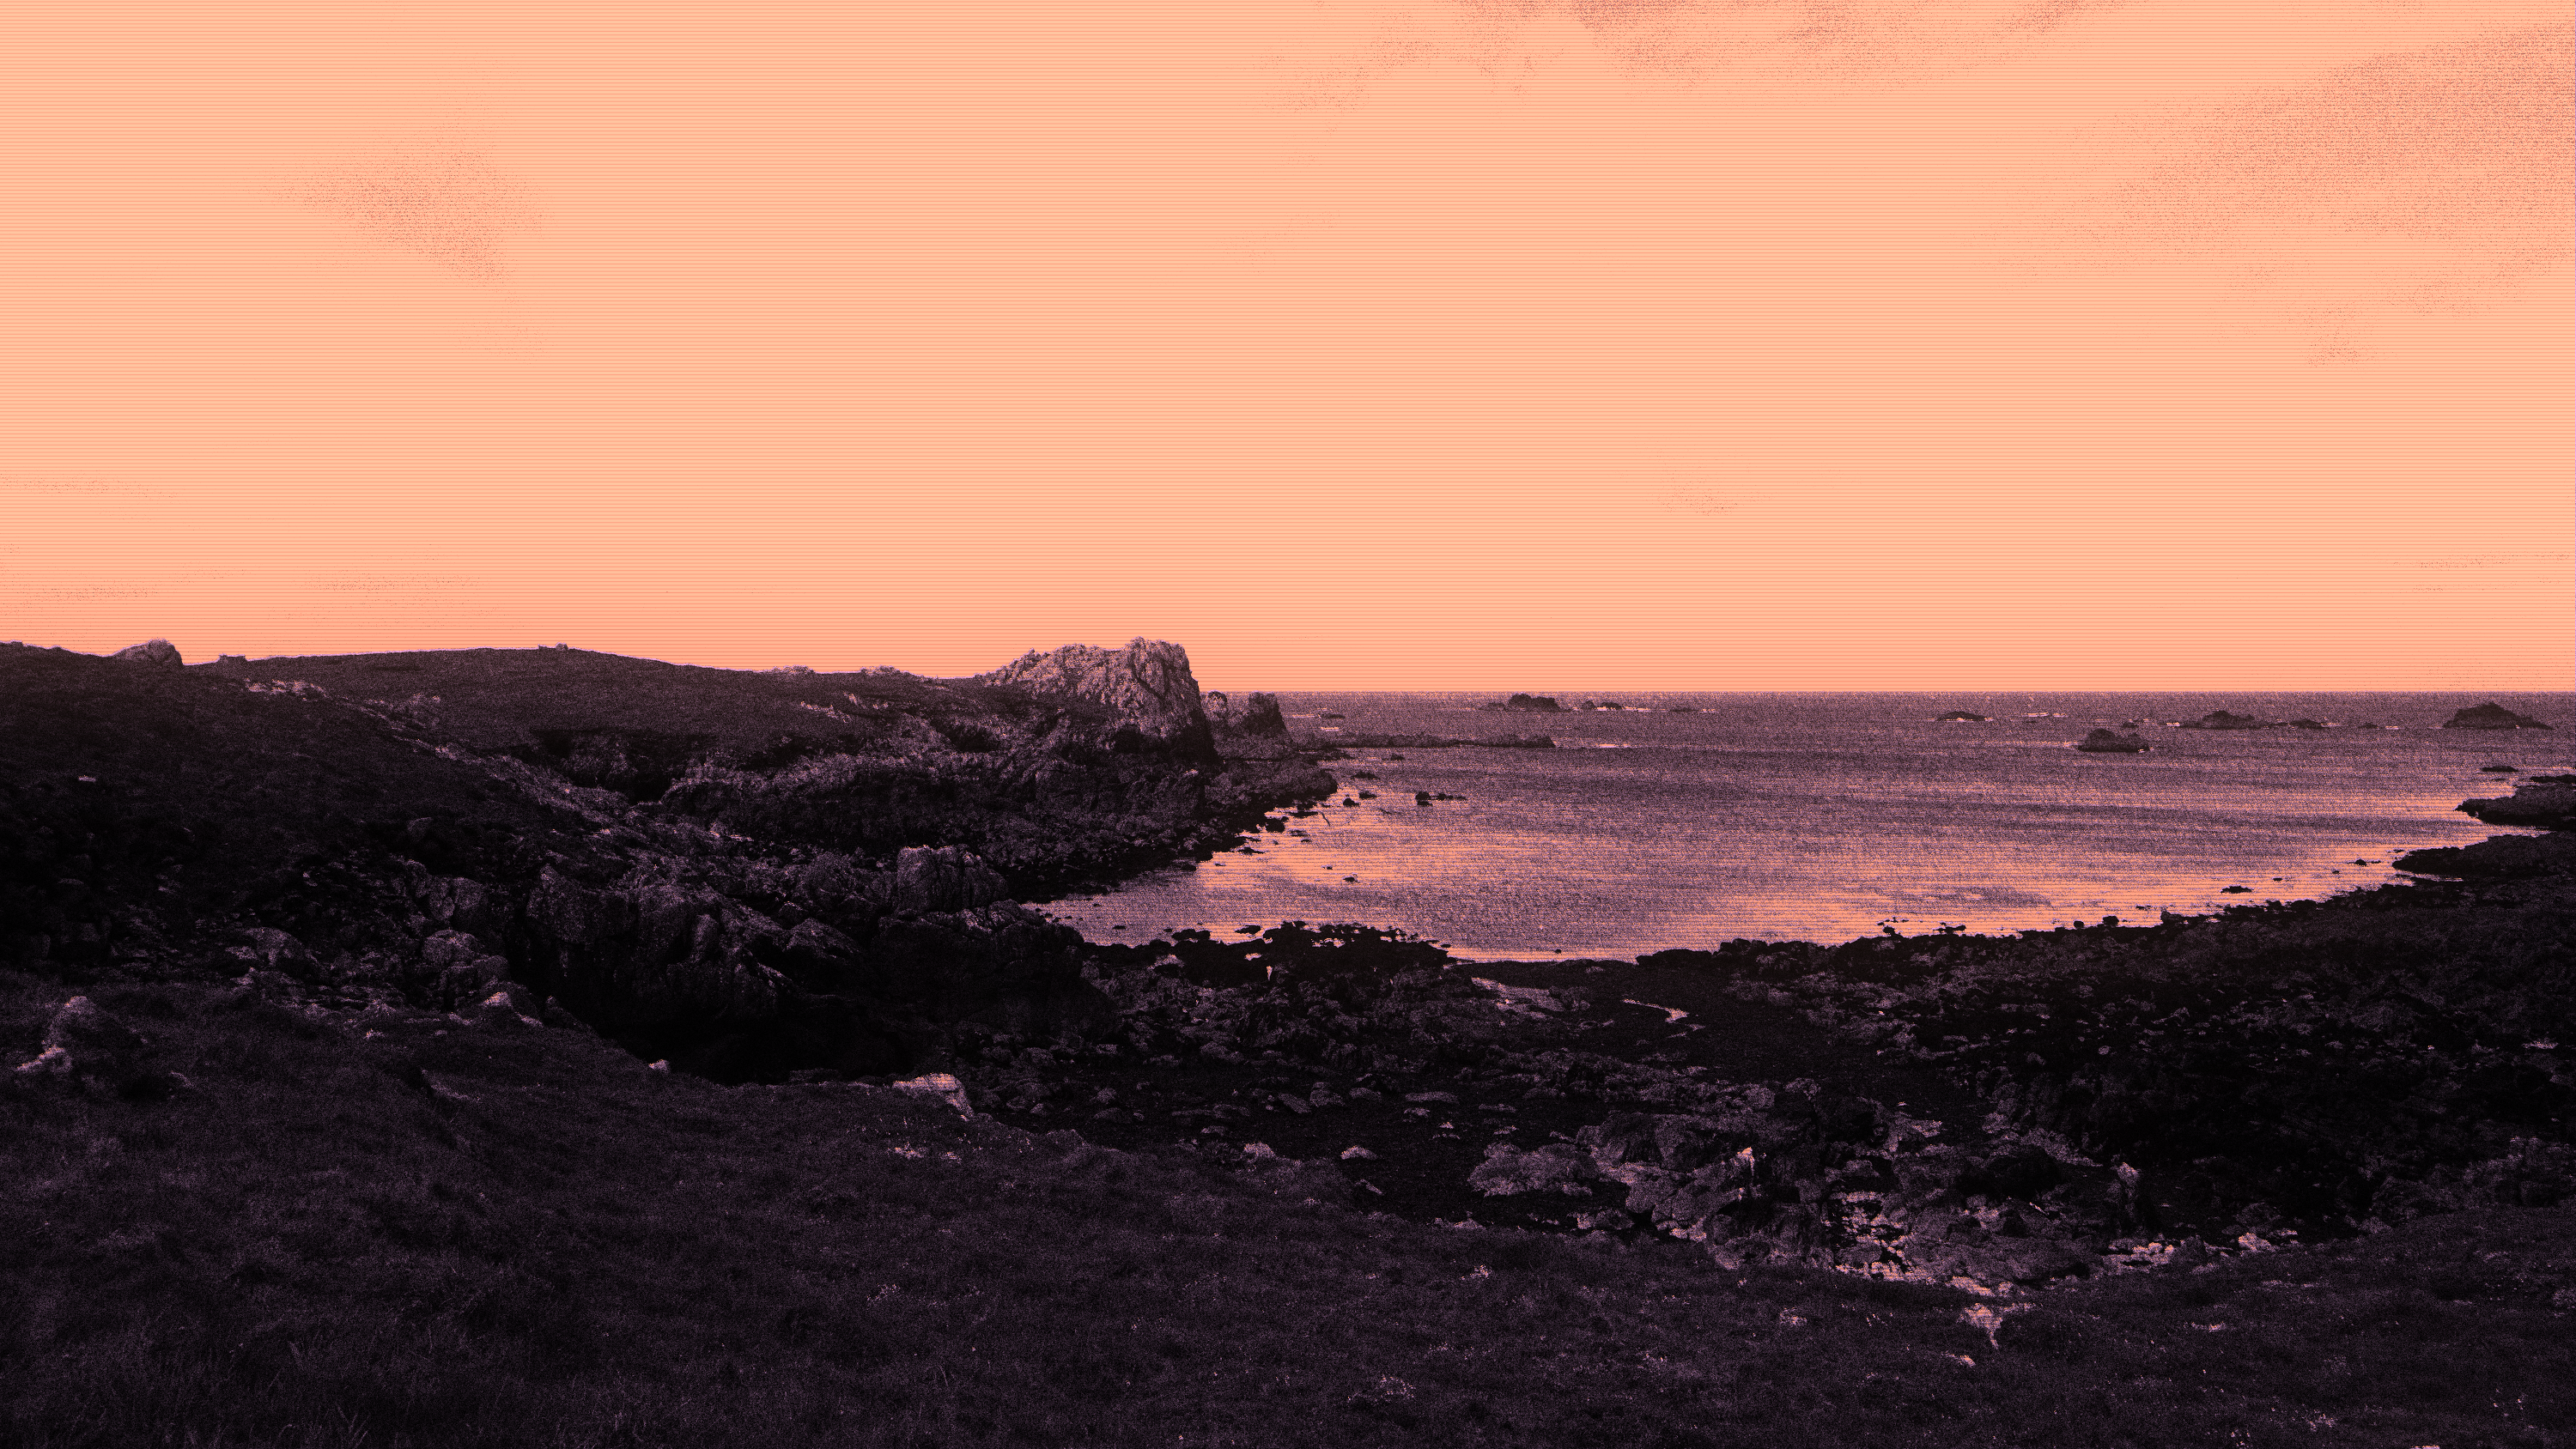
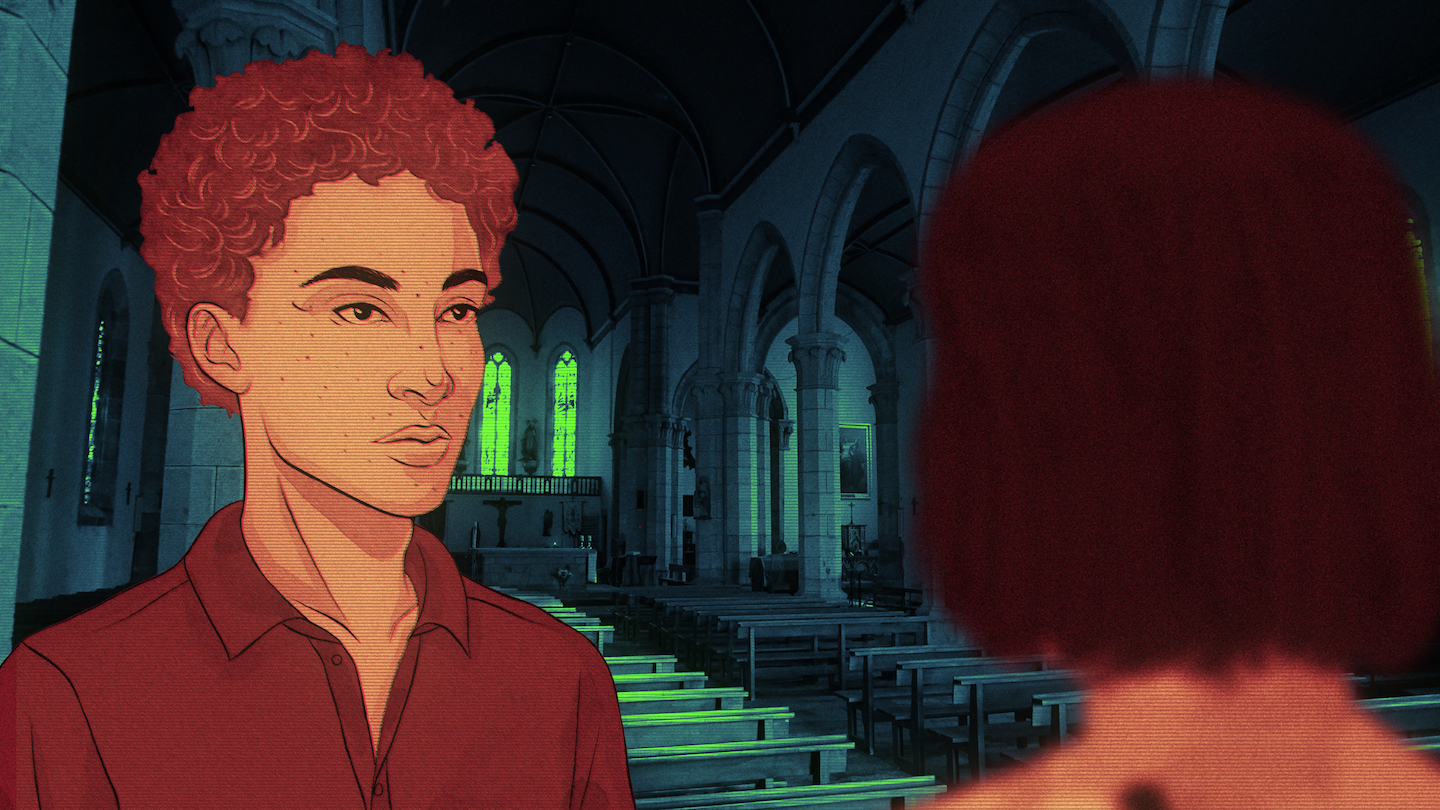
and turns it into something that looks like this:

Image

You can set the proximity/size of the "scanlines", as well as the colour and "glow".
On its own it doesn't look like much but I've been layering this scanner effect on existing compositions for my game project and it looks like this:
Image


So is it actually buried somewhere within Pixelmator Pro under a different name and I just couldn't find it?
Thanks for your help.
User avatar

2019-02-04 16:29:35

That's a great use of the Scanner effect! Pixelmator Pro doesn't have it (at least not yet) due to some difficulties in bringing Quartz Composer effects over nondestructively. However, I have a feeling you should be able to get the same effect by using a 'scanner' texture as an Image fill effect with a Vivid Light blending mode selected. Here's a quick attempt at emulating that effect:

http://upload-cdn.pixelmator.com/Scanner.effects.zip

Basically, I applied the Scanner effect to a blank image in the original Pixelmator (then colored it grey by filling it with the color black using the Overlay blending mode) and, in Pixelmator Pro, used this image as part of an Image fill effect using the Vivid Light blending mode and somewhat adjusting the opacity. Without having your original images, it's difficult for me to tell how close I'm getting, but maybe these techniques will give you some ideas about what you could do.

Hope that helps!
User avatar

2019-02-25 13:20:54

by Andrius 2019-02-04 16:29:35 Basically, I applied the Scanner effect to a blank image in the original Pixelmator (then colored it grey by filling it with the color black using the Overlay blending mode) and, in Pixelmator Pro, used this image as part of an Image fill effect using the Vivid Light blending mode and somewhat adjusting the opacity. Without having your original images, it's difficult for me to tell how close I'm getting, but maybe these techniques will give you some ideas about what you could do.

Hope that helps!
Thanks for your help! That looks great, and pretty close to what I'm going for. The only problem is that my scanner top-layer is usually a different colour from my base image, so I would need to have many different coloured scanner preset images.. which would be fine, except I wasn't able to completely reproduce your effect in Pixelmator.

I should have mentioned that I'm a novice when it comes to photo manipulation, so if you have the time would you able to more slowly walk me through the steps you mentioned above?
Thanks again for your help.
User avatar

2019-02-26 14:20:51

Sure, I'd be happy to elaborate! There are a few different ways to approach this different color aspect, but I'm going to try using blending modes. So, here's what I'd do:

1. Create an empty new image in Pixelmator. Set the size to the same size as your images for the game project. I went for 3200x1800, which is probably overkill in terms of resolution, but I thought I'd go for a slightly larger size.
2. Apply the Scanner effect to the empty image. Choose a neutral gray color — I went for 42% gray on the grayscale slider in the Colors window.
3. Set the Amount and Glow to the same settings you normally use for these images. I went for 0.07 and 0.50 because it seems like the scanlines are fairly small and close together in your images.
4. Apply the effect to the image.
5. Drag the edited effect layer from the Layers palette to somewhere on your desktop or into a Finder window to export it.
6. Open a Pixelmator Pro document with your illustration.
7. Choose the Effects tool and add a Color fill effect to the layer. Change the blending mode of the effect to Color, like so:

Image

This will recolor the image using just the color you choose.

8. With the Effects tool still selected, add an Image fill effect to the same layer. Drop in your scanner texture into the image well. Change the blending mode to Hard Light.
9. Add another Image fill effect to the same layer, drop in the scanner texture into the image well and change the blending mode to Color Burn. The Tool Options pane should now look something like this:

Image

10. Save the Effect combination as a preset.

Next time, you can apply that same preset to any other layer and just choose another color for the color fill effect to recolor it.

I'm not 100% sure that this will get exactly the look that you're going for, but if you could share an unedited image and let me know the steps you use to create your scanner effects, I could try and get as close as I can to the result you're looking for. But for that, it would be a great help if I could have some source/unedited and edited images.
User avatar

2019-02-26 14:22:43

I should mention that there might be a much much easier way of doing this but I can't currently think of one. :smiley:
User avatar

2019-02-26 14:58:55

by Andrius 2019-02-26 14:28:06 I'm not 100% sure that this will get exactly the look that you're going for, but if you could share an unedited image and let me know the steps you use to create your scanner effects, I could try and get as close as I can to the result you're looking for. But for that, it would be a great help if I could have some source/unedited and edited images.
WOW thanks a lot for the breakdown! I'll start working through your tutorial.

In the meantime I'll walk you through my process:
Here is an unedited photo I would use:
Image

-I bring it into Pixelmator and apply the Black and White effect (Brightness: 0.0% - Contrast: 50% - Grain: 30%)

-Then I drag onto it the False Color effect and make the Primary Color black, while the Secondary Color let's say a pink like #ffb4ff (this value changes from one scene of my game to the next)

-Then I copy-paste this layer.

-On the top layer I drag the Scanner effect (Amount: 0.04 - Glow: 30%), and then for colour let's go for a tangerine-ish colour #ffaa8e

-At this point I put the finishing touches (haha) by command clicking and dragging the top layer (ie: the scanner layer) and offsetting it by a couple pixels upward, so that a tiny bit more of the bottom layer's pink can bleed through. I realize that this last step might be impossible to reproduce with Automator.

The end product looks like this:
Image

The colour of the base image and scanner effect will change throughout the game (there is about a dozen or so variations throughout the game).

I really appreciate you helping me out with this. I'll wait to see if you think I should follow the steps you outlined above or, knowing now how I go through this process, if you think I should to this a different way.
Thanks again :)
User avatar

2019-02-26 17:20:56

Oh, wow, that's actually a very cool workflow! The key thing is that the Scanner effect isn't uniformly applied to images, rather it makes scanlines visible in bright parts of an image and makes the rest of the image transparent. I'm sure you've noticed that if you've ever tried to apply the effect to a layer when having just one layer in a composition. This subtle transparency effect is giving me the most trouble so far and I'm not sure if it's possible to reproduce it in Pixelmator Pro completely faithfully. But I seem to have gotten fairly close:

Image

I tried to limit myself to using just effects, so you could process images using Automator. I'm sure there are more clever ways to combine things in the app, but I'm reaching the edges of my Pixelmator Pro abilities, to be honest with you. :grinning: If you want to check out how I got these effects, I've included the presets:

http://upload-cdn.pixelmator.com/Bottom.effects.zip
http://upload-cdn.pixelmator.com/Top.effects.zip

So once you download those, the steps would be to open an image, duplicate it, apply the Bottom preset to the lower layer, and the Top preset to the upper layer.

I'll just explain why the presets are the way they are — I've laid this out bottom to top because that's the order in which effects are applied.

Bottom
Noise. Same as in the original Pixelmator, this is basically what the Grain option does in the Black & White effect. It's at the bottom so that it blends better with the other effects.
Color Controls. Basically the same as Black & white, the Saturation slider removes all color and the Contrast slider increases contrast. P.S. I just realized that, since we're applying the False Color adjustment next, the Saturation slider can be ignored. But it's in the preset, so... *shrug*
False Color. Same as in the original Pixelmator.

Top
Color Controls. I've bumped up the contrast here because I was trying to get the same areas of the image transparent as the Scanner effect does and I basically need the image to be black where it should be transparent and white where it shouldn't. Therefore, the sky should be more or less white and the rocks should be more or less black.
Posterize. This helps limit the colors further so the Mask to Alpha effect coming next works better. P.S. The Posterize effect doesn't seem to be necessary in the Top preset — when I was experimenting I had it set to a lower value, but when the contrast is already pretty high, Posterize isn't necessary.
Mask to Alpha. Basically creates an alpha (grayscale) mask from the image, which is part of what gives the Scanner effect its signature look.
Color fill. Fills the image with a custom color and acts as the base for the scanner texture coming later.
Noise. Adds a touch of noise to match the grainy look of the lower layer.
Image fill. I created a custom scanner texture here, so it has only black lines and is transparent everywhere else, which makes it easier to blend using different blending modes. The blending mode is set to overlay, which makes the effect subtle.
User avatar

2019-02-26 21:09:59

by Andrius 2019-02-26 17:20:56 Oh, wow, that's actually a very cool workflow! The key thing is that the Scanner effect isn't uniformly applied to images, rather it makes scanlines visible in bright parts of an image and makes the rest of the image transparent. I'm sure you've noticed that if you've ever tried to apply the effect to a layer when having just one layer in a composition. This subtle transparency effect is giving me the most trouble so far and I'm not sure if it's possible to reproduce it in Pixelmator Pro completely faithfully. But I seem to have gotten fairly close


This is really incredible work, thank you so much. I'm going to take a couple to really digest all of this and see if I have any other questions, but this is unbelievably helpful.

I'll be sure to thank you in the credits of my game :)
User avatar

2019-02-26 21:25:52

Yeah, I'd suggest playing around with the presets yourself — first of all, experiment with the colors of the False Color and Color fill effects and then play around with different blending modes for the Image fill effect. Then maybe try turning some of the effects on and off as well. I'd love to hear how you get on!
User avatar

2019-03-30 11:34:12

by Andrius 2019-02-26 21:25:52 Yeah, I'd suggest playing around with the presets yourself — first of all, experiment with the colors of the False Color and Color fill effects and then play around with different blending modes for the Image fill effect. Then maybe try turning some of the effects on and off as well. I'd love to hear how you get on!
Hi again Andrius! Once again would like to thank you for such a huge help with the effect presets!
One quick question, is there a way for Automator to apply the "bottom" and "top" effects sequentially? Because I created a "quick action" with Automator so that I can apply both layers, but what ends up happening is that it simply creates two new images: one of just the bottom layer, the other with just the top layer.

Is there a way for Automator to do the following:
-apply "Bottom" effect
-copy paste the effected image onto a new layer
-apply "Top" effect to the (new) top layer?

If this isn't possible, that's ok. I will instead batch apply the "Bottom" effect to all the images, and then manually open all those "Bottom"d images in Pixelmator, copy-paste a new layer and apply the top filter. But just checking to see if there isn't a way to automate that..
User avatar

2019-04-01 10:52:51

Hey again! I've done some digging and haven't found a way to automate this, unfortunately :( I think creating actions with variables of some kind should help, but at the moment, the Pixelmator Pro effects are, so to speak, isolated within the app. So while layering one image would work with the effects themselves, layering a different image each time is not possible right now. Should've thought about that in my original reply!

Also, if you do part of this manually, I'd suggest using the following workflow:

1. Get Specified Finder Items
2. Copy Finder Items (to a location of your choice)
3. Change Type of Images (to PXD)
4. Apply Effects to Images (Bottom)
5. (Optionally) Rename Finder Items: Make Sequential (unless you're happy with the names of the images as they are)

After doing this, just save the same file and you can later create a workflow for changing the images from PXD to a format of your choice, so you don't have to export manually.

I'm suggesting the steps above as, this way, the original image will be preserved in the PXD file when you open it and you'll get the same effect you see in the app. If you work on PNG or JPEG, the effect will be applied destructively and you'll be applying the Top effect to an image that's already been processed by the Bottom effect, which gives slightly different results.
User avatar

2023-11-14 06:27:59

by Andrius That's a great use of the Scanner effect! Pixelmator Pro doesn't have it (at least not yet) due to some difficulties in bringing Quartz Composer effects over nondestructively. However, I have a feeling you should be able to get the same effect by using a 'scanner' texture as an Image fill effect with a Vivid Light blending mode selected. Here's a quick attempt at emulating that effect:

http://upload-cdn.pixelmator.com/Scanner.effects.zip rice purity test

Basically, I applied the Scanner effect to a blank image in the original Pixelmator (then colored it grey by filling it with the color black using the Overlay blending mode) and, in Pixelmator Pro, used this image as part of an Image fill effect using the Vivid Light blending mode and somewhat adjusting the opacity. Without having your original images, it's difficult for me to tell how close I'm getting, but maybe these techniques will give you some ideas about what you could do.

Hope that helps!
Thank you for providing a solution to recreate the Scanner effect in Pixelmator Pro! I appreciate the effort you put into finding an alternative method using an image fill effect with the Vivid Light blending mode. I will definitely give it a try and see if it achieves a similar result. Your guidance and suggestions are greatly appreciated. Thanks again!