Table of Contents
Apply blur effects
Pixelmator Pro includes 9 different blur effects: Gaussian, Box, Disc, Motion, Zoom, Spin, Bokeh, Tilt-Shift, and Focus — each of these blurs layers in a different way.
Add a blur to an image
Blur effects can be applied directly to a single layer or, using an effects layer, to multiple layers in a composition.
To edit the currently selected layer, do one of the following:
- Choose Format > Effects > Blur (from the Format menu at the top of your screen) and choose a type of blur you want to add.
- Click
 in the
Tools sidebar, then click Add Effect and add the Blur effect you want.
in the
Tools sidebar, then click Add Effect and add the Blur effect you want. - Press on your keyboard, click Add Effect and add the Blur effect you want.
To edit multiple layers in a composition using an effects layer (all layers below this layer will be affected):
- Choose Insert > Effects (from the Insert menu at the top of your screen), click Add Effect in the Tool Options pane and add the Blur effect you want.
- Click
 at the top of the
Layers sidebar, choose Effects, click Add Effect in the Tool Options pane and add the Blur effect you want.
at the top of the
Layers sidebar, choose Effects, click Add Effect in the Tool Options pane and add the Blur effect you want. - Press + + on your keyboard, click Add Effect in the Tool Options pane and add the Blur effect you want.
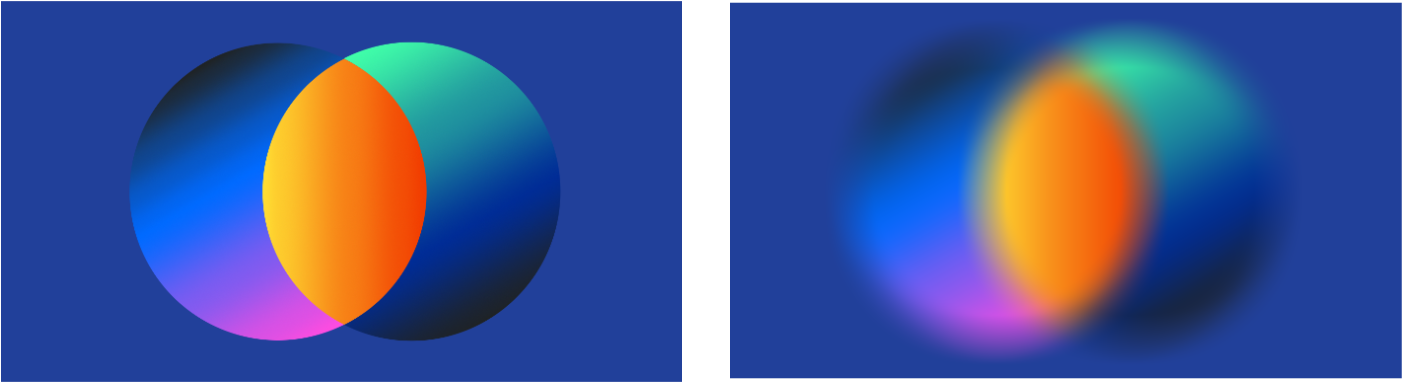
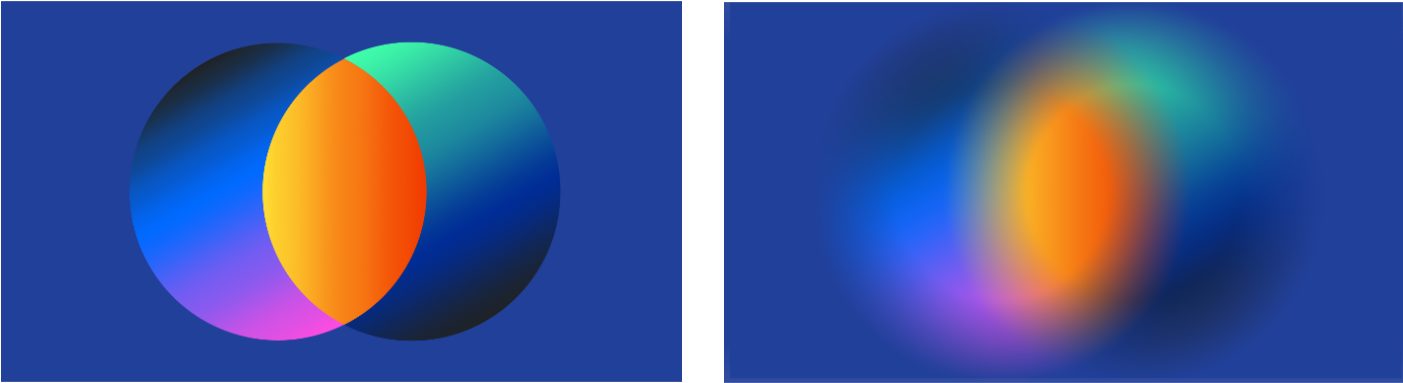
Apply a Gaussian blur
The Gaussian blur effect adds a smooth, even blur to your entire image, text, or shape layer.
- Drag the Radius slider to the right to make the Gaussian blur effect stronger, or to the left to reduce it. Hold down the key to extend the range of the Radius slider. You can also enter a value from 0.0 px to 400.0 px.

Show Original: Click the Show Original button or press + on your keyboard to see what the image looks like without any effects.
Show Split Comparison: – click the Show Original button, press + on your keyboard, or force click the canvas.
To reset all effects, click Reset at the bottom of the Tool Options pane.
To preserve layer transparency when applying the Gaussian blur effect, click the effect name in the Tool Options pane and choose Preserve Transparency.
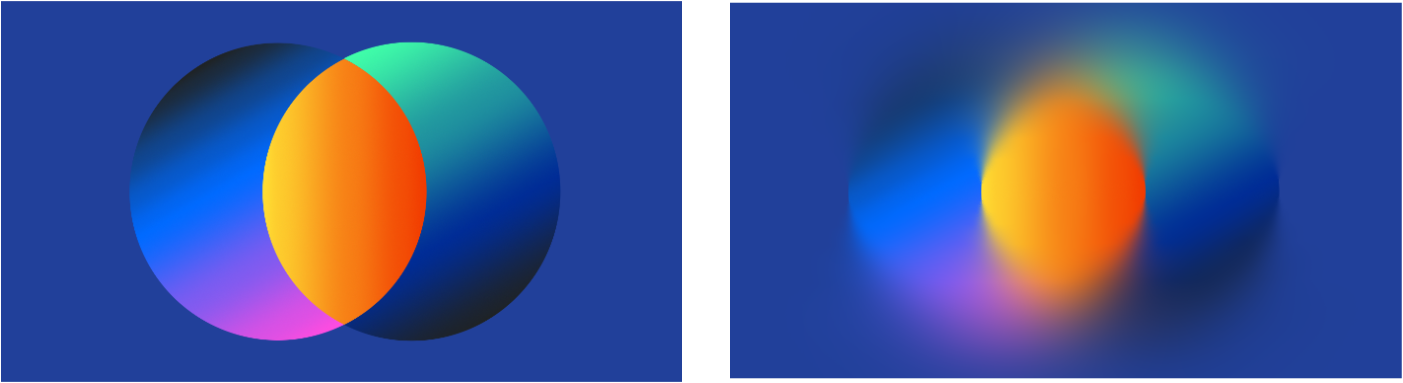
Apply a Box blur
The box blur effect blurs the image and adds distinctive box shapes near contrasting areas.
- Drag the Radius slider to the right to make the Box blur effect stronger, or to the left to reduce it. Hold down the key to extend the range of the Radius slider. You can also enter a value from 0.0 px to 400.0 px.
Show Original: Click the Show Original button or press + on your keyboard to see what the image looks like without any effects.
Show Split Comparison: – click the Show Original button, press + on your keyboard, or force click the canvas.
To reset all effects, click Reset at the bottom of the Tool Options pane.
To preserve layer transparency when applying the Box blur effect, click the effect name in the Tool Options pane and choose Preserve Transparency.
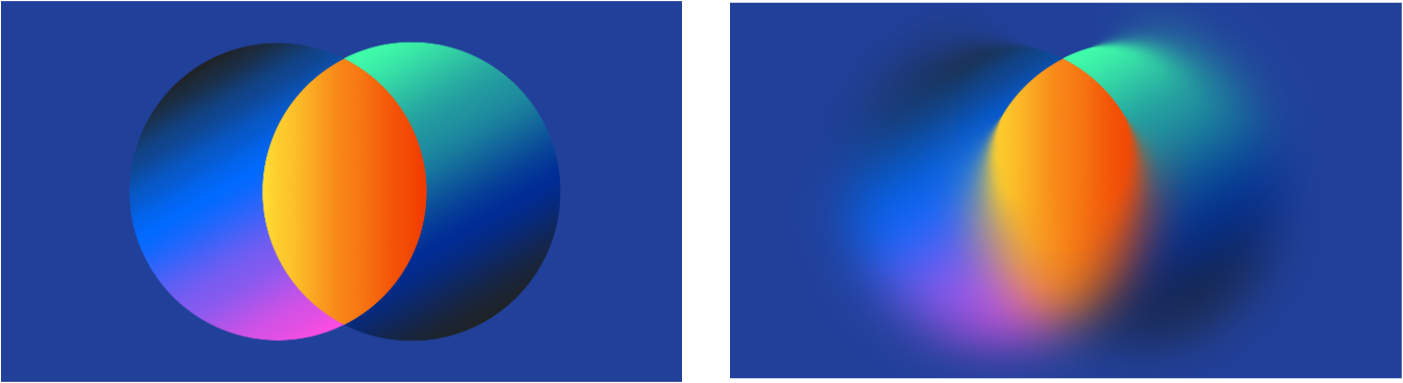
Apply a Disc blur
The disc blur effect blurs the image and adds distinctive disc shapes near contrasting areas. The effect can be used to simulate the bokeh effect created by digital cameras in out-of-focus areas.
- Drag the Radius slider to the right to make the Disc blur effect stronger, or to the left to reduce it. Hold down the key to extend the range of the Radius slider. You can also enter a value from 0.0 px to 400.0 px.
Show Original: Click the Show Original button or press + on your keyboard to see what the image looks like without any effects.
Show Split Comparison: – click the Show Original button, press + on your keyboard, or force click the canvas.
To reset all effects, click Reset at the bottom of the Tool Options pane.
To preserve layer transparency when applying the Disc blur effect, click the effect name in the Tool Options pane and choose Preserve Transparency.
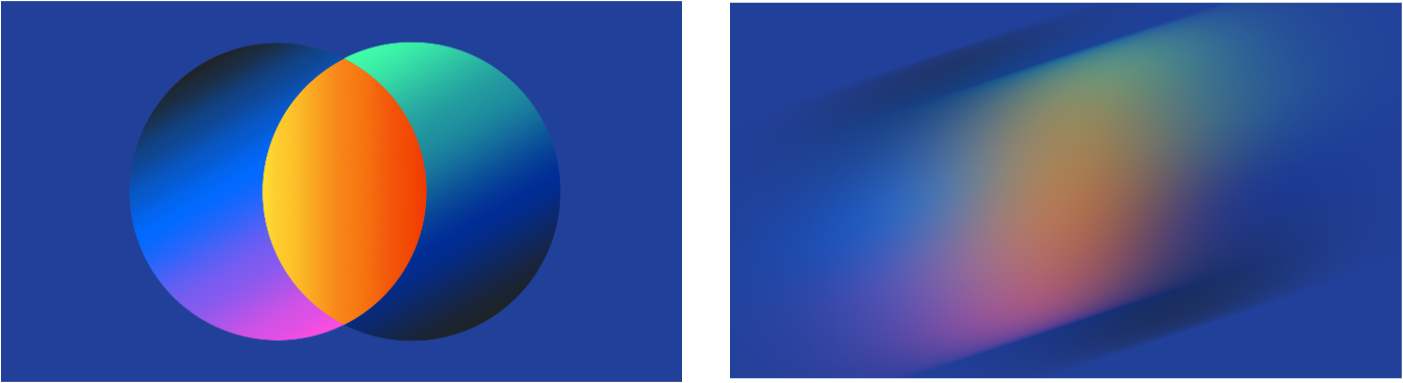
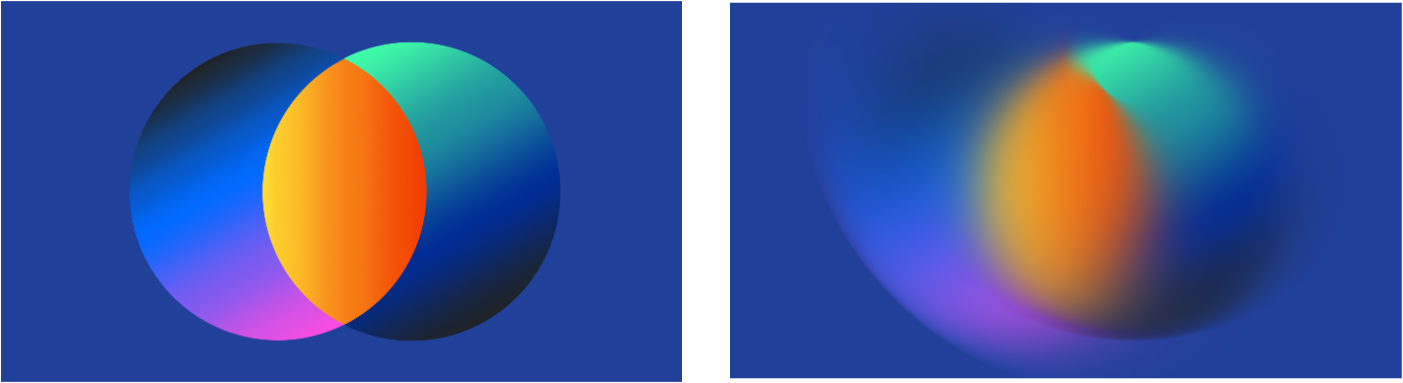
Apply a Motion blur
The Motion blur effect adds a blur that flows in one direction, creating the impression of speed and movement.
Drag the Radius slider to the right to make the motion blur effect stronger, or to the left to reduce it. Hold down the key to extend the range of the Radius slider. You can also enter a value from 0.0 px to 400.0 px.
Move the Angle wheel to change the direction of the motion blur. You can also enter a value from 0.0º to 359.9º.
Show Original: Click the Show Original button or press + on your keyboard to see what the image looks like without any effects.
Show Split Comparison: – click the Show Original button, press + on your keyboard, or force click the canvas.
To reset all effects, click Reset at the bottom of the Tool Options pane.
To preserve layer transparency when applying the Motion blur effect, click the effect name in the Tool Options pane and choose Preserve Transparency.
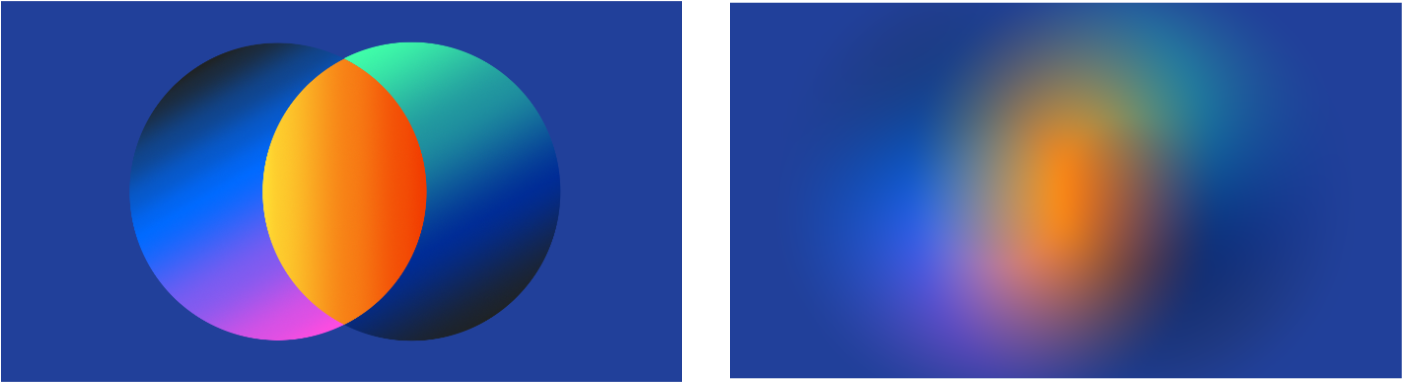
Apply a Zoom blur
The Zoom blur effect simulates the look of capturing a photo while zooming in or out.
- Drag the Amount slider to the right to create a zooming in effect, or to the left to create zooming out effect. Hold down the key to extend the range of the Amount slider. You can also enter a value from -200.0 px to 200.0 px.
- Move the handle of the effect rope to set the direction of the zoom effect. If the effect rope isn’t visible, click the rope button in the Tool Options pane.
Show Original: Click the Show Original button or press + on your keyboard to see what the image looks like without any effects.
Show Split Comparison: – click the Show Original button, press + on your keyboard, or force click the canvas.
To reset all effects, click Reset at the bottom of the Tool Options pane.
To preserve layer transparency when applying the Zoom blur effect, click the effect name in the Tool Options pane and choose Preserve Transparency.
Apply a Bokeh blur
The Bokeh blur effect simulates out-of-focus regions captured on camera.
- Drag the Radius slider to the right to make the blurring stronger, or to the left to reduce it. You can also enter a value from 0.0 px to 100.0 px.
- Drag the Ring Amount slider to add less or more emphasis at the ring of the bokeh. You can also enter a value from 0% to 100%.
- Drag the Ring Size slider to adjust the size of the bokeh ring. You can also enter a value from 0% to 100%.
Show Original: Click the Show Original button or press + on your keyboard to see what the image looks like without any effects.
Show Split Comparison: – click the Show Original button, press + on your keyboard, or force click the canvas.
To reset all effects, click Reset at the bottom of the Tool Options pane.
To preserve layer transparency when applying the Bokeh blur effect, click the effect name in the Tool Options pane and choose Preserve Transparency.
Apply a Tilt-shift blur
The Tilt-Shift blur effect creates a shallow depth of field, leaving a smaller, rectangular area in focus. This can be used to create a miniaturized look.
- Customize the effect:
- Drag the Blur slider to the right to make the blurring stronger, or to the left to reduce it. You can also enter a value from 0.0 px to 100.0 px.
- Drag the Transition slider to set how gradually the effect should transition from blurred to in-focus. You can also enter a value from 0% to 100%.
- Move the handle of the effect rope to choose which area should be in focus and which areas should be blurred. Drag the handle of the outer circle to set how large an area should be blurred. If the effect rope isn’t visible, click the rope button in the Tool Options pane.
Show Original: Click the Show Original button or press + on your keyboard to see what the image looks like without any effects.
Show Split Comparison: – click the Show Original button, press + on your keyboard, or force click the canvas.
To reset all effects, click Reset at the bottom of the Tool Options pane.
To preserve layer transparency when applying the Tilt-shift blur effect, click the effect name in the Tool Options pane and choose Preserve Transparency.
Apply a Focus blur
The Focus blur effect leaves a circular area in focus, blurring everything outside it.
- Customize the effect:
- Drag the Blur slider to the right to make the blurring stronger, or to the left to reduce it. You can also enter a value from 0.0 px to 100.0 px.
- Drag the Transition slider to set how gradually the effect should transition from blurred to in-focus. You can also enter a value from 0% to 100%.
- Move the handle of the effect rope to choose which area should be in focus and which areas should be blurred. Drag the handle of the outer circle to set how large an area should be blurred. If the effect rope isn’t visible, click the rope button in the Tool Options pane.
Show Original: Click the Show Original button or press + on your keyboard to see what the image looks like without any effects.
Show Split Comparison: – click the Show Original button, press + on your keyboard, or force click the canvas.
To reset all effects, click Reset at the bottom of the Tool Options pane.
To preserve layer transparency when applying the Focus blur effect, click the effect name in the Tool Options pane and choose Preserve Transparency.
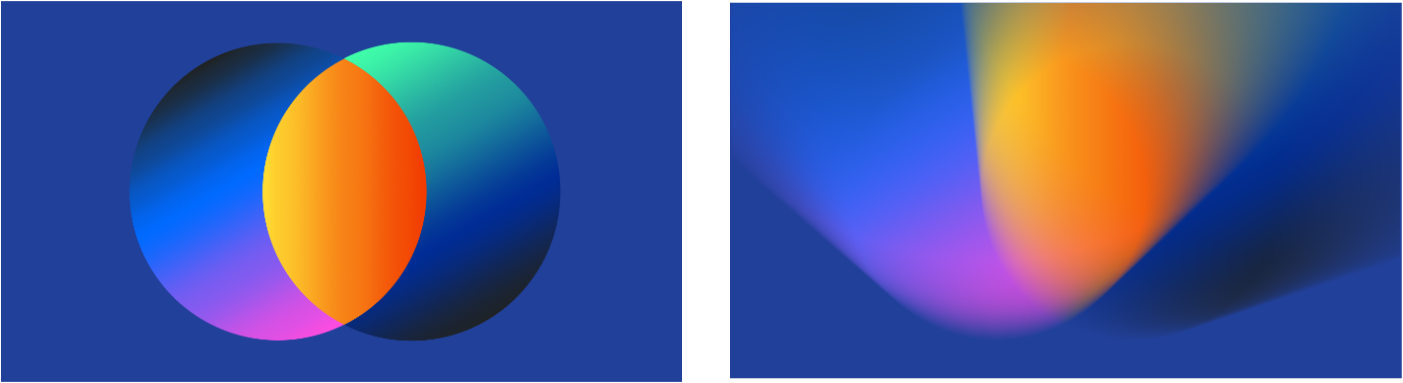
Apply a Spin blur
The Spin blur effect simulates the look of circular motion — a spinning wheel, for example — captured on camera.
- Drag the Amount slider to the right to make the spin effect stronger, or to the left to reduce it. Hold down the key to extend the range of the Amount slider. You can also enter a value from 0% to 200%.
- Move the handle of the effect rope to choose which area should be the center of the spin effect. If the effect rope isn’t visible, click the rope button in the Tool Options pane.
Show Original: Click the Show Original button or press + on your keyboard to see what the image looks like without any effects.
Show Split Comparison: – click the Show Original button, press + on your keyboard, or force click the canvas.
To reset all effects, click Reset at the bottom of the Tool Options pane.
To preserve layer transparency when applying the Spin blur effect, click the effect name in the Tool Options pane and choose Preserve Transparency.


