Table of Contents
Edit vector paths
You can easily further refine any of the vector paths in a shape by adding or removing anchor points, adjusting their roundness, making them sharp, and moving them. To edit the anchor points in a vector path, you first need to make the path editable.
Make a vector path editable
Making a vector path editable lets you see and edit each of its points or add more points.
- Select the path you’d like to edit.
- Make the path editable by doing one of the following:
- – click the shape and choose Make Editable from the shortcut menu.
- Choose Format > Shapes > Make Editable.
- Press the key on your keyboard.
To exit editing, do one of the following:
- Double-click anywhere outside the path.
- – click the image canvas and choose Exit Editing from the shortcut menu.
- Press the key on your keyboard.
Tip: If you’ve previously edited a vector path, you can double-click it to make it editable once again.
Select points in a vector path
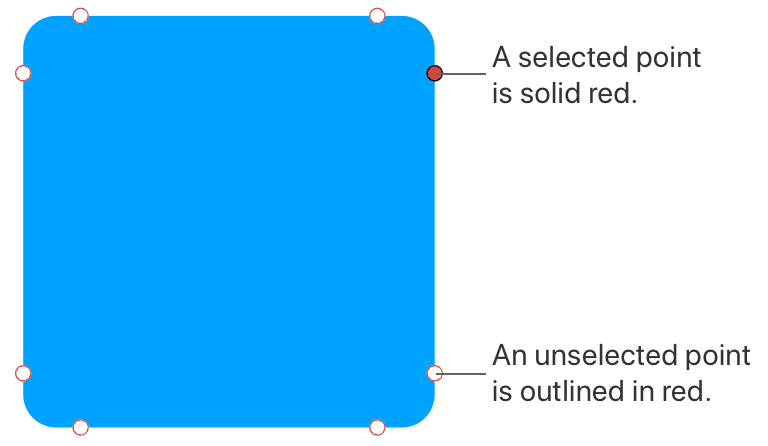
After you make a vector path editable, you can select one or more of its points to move, reshape, or remove them. An unselected point is outlined in red, while a selected one is solid red.
To select a single point, simply click it.
To select multiple points, do one of the following:
- After making a vector path editable, drag to draw a selection box over the points you’d like to select.
- Press and hold the or key and click a point to select it, adding it to points you have already selected.
Tip: You can also reverse a selection of points so that any currently selected points are deselected and vice versa. To do that, press and hold the or keys while drawing a selection over a number of different points.
Add additional points to a vector path
- Make a vector path editable.
- Do one of the following:
- Double-click part of a path segment between two points.
- – click part of a path segment between two points and choose Add Point.
Remove points from a vector path
- Make a vector path editable.
- Do one of the following:
- Select one or more points and press the key.
- Select one or more points, – click one of them and choose Remove Point.
Convert sharp and smooth points
Sharp points have straight lines connecting to them, while smooth points have curved lines.
- Make a vector path editable.
- Change a point from smooth to sharp and vice versa by doing one of the following:
- Double-click a point.
- – click a point and choose Make Sharp Point or Make Smooth Point.
Tip: To sharpen or smooth all the points in a path, – click a vector path on the canvas (without making it editable) and choose Sharpen Path or Smooth Path from the shortcut menu.
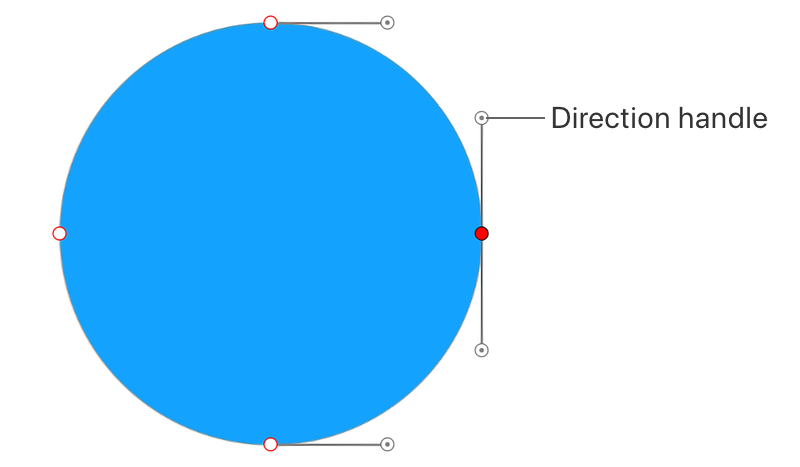
Reshape a smooth point
- Make a vector path editable.
- Click to select the point you’d like to reshape.
- Drag the direction handles that appear.
Convert a smooth point into an adjustable sharp point
When you move one direction handle of a smooth point, the opposite handle moves symmetrically so the two segments connect smoothly at that point. If you’d like to adjust the direction handles independently, you can disconnect them, turning the smooth point into an adjustable sharp point.
- Make a vector path editable.
- Click to select the point you’d like to reshape.
- – drag one of the direction handles that appear. To move the other handle, release the key and drag the direction handle. To realign the direction lines, press and hold the key, then drag one of the direction handles.
Join or divide paths
Divide lets you open closed paths (if you'd like to continue drawing, for instance) or split them into separate paths.
To split a path:
- Make a vector path editable.
- Click to select an anchor point (or points) where you want the path to split.
– click the selected point and choose Divide.
Note: To split a closed path into two open paths, make sure you select two points on the path. If you divide a closed path in one place only, you'll open the path instead of splitting it. When a path is split, the style of the original path (such as stroke weight, fill color, and shadows) applies to the newly created ones.
Open paths essentially become lines, so their stroke position is automatically reset to Center.
Join option lets you connect two open paths in a shape to create one single open path or form a closed path.
To join two open paths in a shape:
- Make the shape editable.
- Shift-click to select the endpoints of the paths you want to connect. You can also select the endpoints of the same path to close it (or use the Close Path option).
- – click one of the selected paths and choose Join.
When open paths are joined, they are connected with a straight line going directly from endpoint to endpoint. To change the path shape, add additional vector points.
Show or hide outlines around vector shapes
- With any shape tool or the Arrange tool selected, – click a shape and choose Show Outline.


