Table of Contents
Arrange and combine shapes
Shape layers are essentially just like other layers (images and text), so to move or resize them, you can simply use the Arrange tool.
Whenever you draw a shape in your image, Pixelmator Pro, by default, adds each shape on its own separate layer. However, there are several options for combining shapes, so instead of being on its own layer, one shape can be united, subtracted, intersected with, or excluded from another. When shapes are combined, multiple shape layers become a single shape with multiple components.
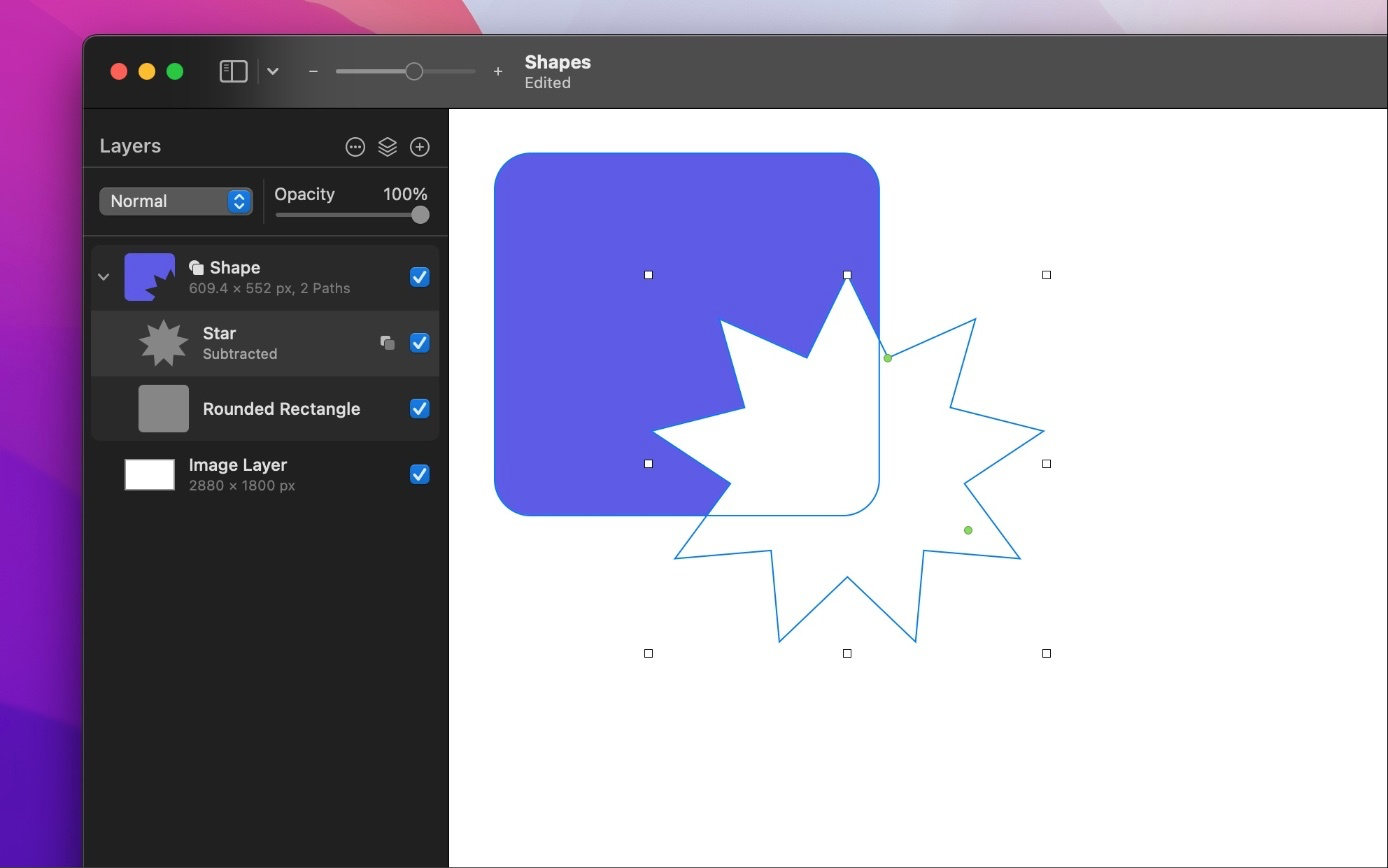
Note: By default, shape layers have blue thumbnails, while thumbnails of the shape components are gray.
It’s important to note that, when combining shapes, the selected option applies to the combination of all the shapes below. For example, if you add two shapes, the upper shape can be subtracted from the one below, but not vice versa. Then, if you add another shape and, say, exclude it from the two lower shapes in the group, the two lower shapes are combined first, then, the upper shape is excluded from the result of the two shapes below.
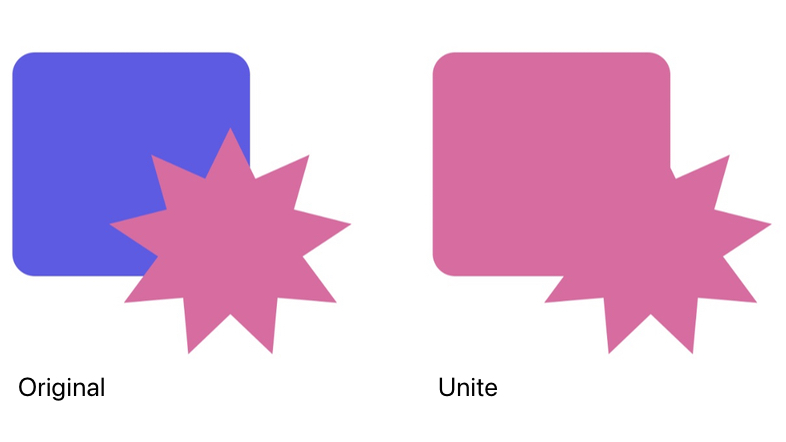
Unite shapes
When you unite several shapes, multiple shape layers are united into a single shape with multiple components. A united shape looks the same, but can be easily moved as one and each individual component can be adjusted to unite, subtract, intersect, or exclude from the overall shape.
- Add two or more shapes to your image.
- Choose one of the vector tools — the Pen, Freeform Pen, or one of the shapes in Tools > Draw (from the Tools menu at the top of your screen).
- In the Layers sidebar, – click to select all the shapes you’d like to unite.
Do one of the following:
- Choose Format > Shape > Unite Shapes (from the Format menu at the top of your screen).
- – click a shape in the Layers sidebar and choose Unite Shapes.
- Click the Unite button in the Tool Options pane.
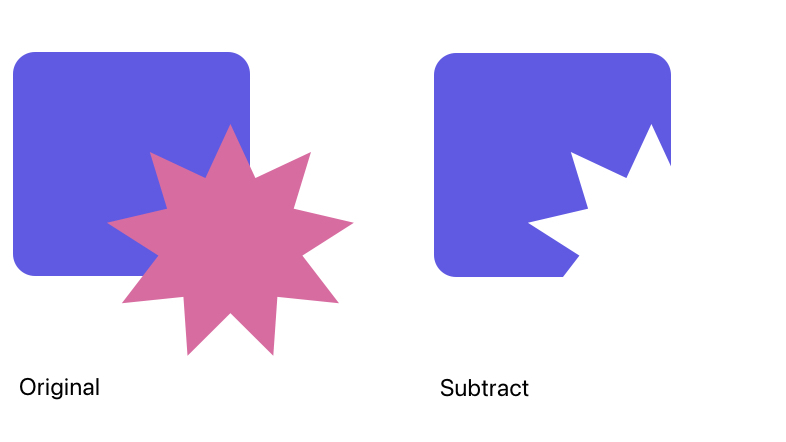
Subtract shapes
When you subtract one shape from another, any areas the selected shape overlaps are removed from the shape or shapes below (the subtracted shape is also not visible at all). For example, if you add a rectangle shape and an ellipse above it, an elliptical area will be removed from the rectangle shape.
- Add two or more shapes to your image.
- Choose one of the vector tools — the Pen, Freeform Pen, or one of the shapes in Tools > Draw.
- In the Layers sidebar, – click to select all the shapes you’d like to edit.
- Do one of the following:
- Choose Format > Shape > Subtract Shapes (from the Format menu at the top of your screen).
- – click a shape in the Layers sidebar and choose Subtract Shapes.
- Click the Subtract button in the Tool Options pane.
Note: When subtracting a shape, all the shape components below it are combined first, then the selected shape is subtracted from the result.
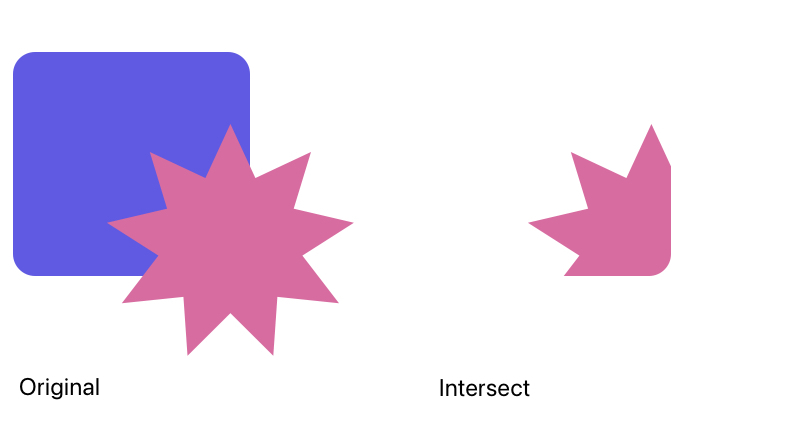
Intersect shapes
When you intersect one shape with another, only overlapping areas are left and any others are removed. For example, if you have two overlapping ellipse shapes next to each other, only the overlapping areas in the middle will remain after intersecting the shapes.
- Add two or more shapes to your image.
- Choose one of the vector tools — the Pen, Freeform Pen, or one of the shapes in Tools > Draw.
- In the Layers sidebar, – click to select all the shapes you’d like to edit.
- Do one of the following:
- Choose Format > Shape > Intersect Shapes (from the Format menu at the top of your screen).
- – click a shape in the Layers sidebar and choose Intersect Shapes.
- Click the Intersect button in the Tool Options pane.
Note: When intersecting shapes, all the shape components below the selected (or uppermost) shape are combined first, then the selected shape is subtracted from the result.
Exclude shapes
When you exclude one shape from another, any overlapping areas are removed and all others remain. For example, if you have two overlapping ellipse shapes next to each other, the overlapping areas in the middle will be removed after excluding the shapes.
- Add two or more shapes to your image.
- Choose one of the vector tools — the Pen, Freeform Pen, or one of the shapes in Tools > Draw.
- In the Layers sidebar, – click to select all the shapes you’d like to edit.
- Do one of the following:
- Choose Format > Shape > Exclude Shapes (from the Format menu at the top of your screen).
- – click a shape in the Layers sidebar and choose Exclude Shapes.
- Click the Exclude button in the Tool Options pane.
Note: When excluding shapes, all the shape components below the selected (or uppermost) shape are combined first, then overlapping areas are excluded from the result.

View the components of a shape
Click the disclosure triangle next to the shape in the Layers sidebar. You can then click to select each component, move it, or adjust how it is combined with the components below.
To distinguish the different shape components easier you can also choose to display their outlines.
Show or hide the shape outline:
- With the Shape tool or the Arrange tool selected, – click a shape and choose Show Shape Outline.
- Choose View > Overlays > Shape Outline (from the View menu at the top of the screen).
Merge the components of a shape
Merging the components of a shape can be useful when you want to make advanced edits to a shape as one path instead of adjusting its component paths individually.
To merge the components of a shape, do one of the following:
- Choose Format > Shape > Merge Shape Components (from the Format menu at the top of your screen).
- – click a shape in the Layers sidebar and choose Merge Shape Components.


