Table of Contents
Selectively balance the colors in an image
The Color Balance adjustment lets you add color tints to the shadows, midtones, and highlights of an image individually. This tool is often used in the video and cinema industry for color grading — getting a specific and consistent look in a video or movie. The fact that you can adjust the tints in each brightness range separately means you can create unique lighting effects very easily. And because colors often determine the emotional impact of photos, making even subtle changes can have a big effect on the overall mood and feel of an image.
Color balance can be adjusted using color wheels (a Master wheel and 3-Way Color wheels) or sliders, available from the Color Balance pop-up menu. It can also be enhanced automatically using the ML adjustment.
Color balance an image
The Color Balance adjustment can be applied directly to a single layer or, using a color adjustments layer, to multiple layers in a composition.
To selectively balance colors in the currently selected layer, do one of the following:
- Choose Format > Color Adjustments > Color Balance (from the Format menu at the top of your screen).
- In the Tools sidebar, click
 and turn on the Color Balance adjustment.
 - Press on your keyboard and turn on the Color Balance adjustment.
To color balance multiple layers in a composition using a color adjustments layer (all layers below this layer will be affected):
- Choose Insert > Color Adjustments (from the Insert menu at the top of your screen) and turn on the Color Balance adjustment in the Tool Options pane.
- Click
 at the top of the
Layers sidebar, choose Color Adjustments, and turn on the Color Balance adjustment.
at the top of the
Layers sidebar, choose Color Adjustments, and turn on the Color Balance adjustment. - Press + + on your keyboard, and turn on the Color Balance adjustment.
Note: If the adjustment isn't visible, you can turn it on from the Customize menu at the bottom of the Color Adjustments pane.
Selectively balance the colors in an image using color wheels
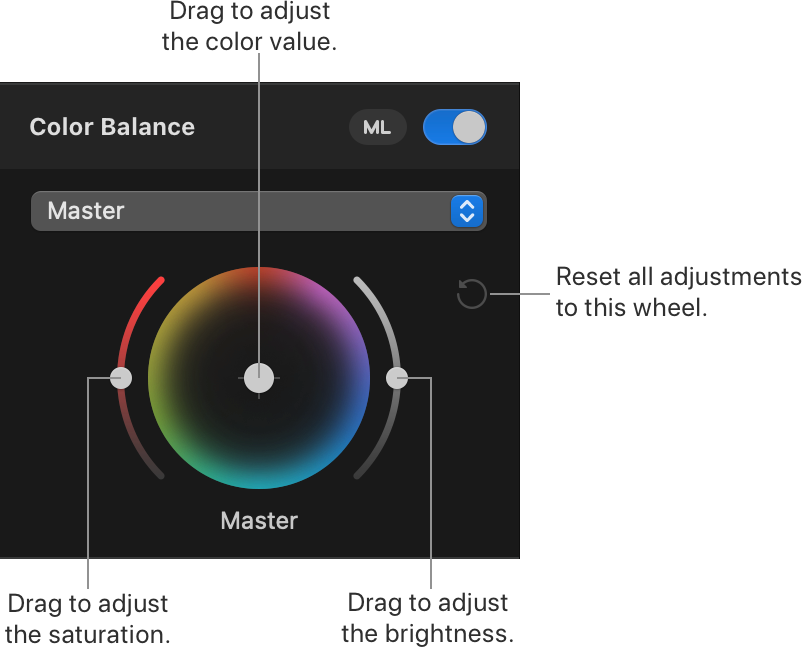
The color wheel interface is inspired by professional color grading tools found in video editing apps. It may be a little overwhelming at first, but it's probably the most natural and intuitive way to add color tints to the shadows, midtones, and highlights of an image.
To get started, click the Color Balance pop-up menu in the Tool Options pane to choose how you want to adjust your image.
- Click Master to use the master color wheel to add a color tint to the entire image. This can be a useful starting point if you want one color to be more prominent than others.
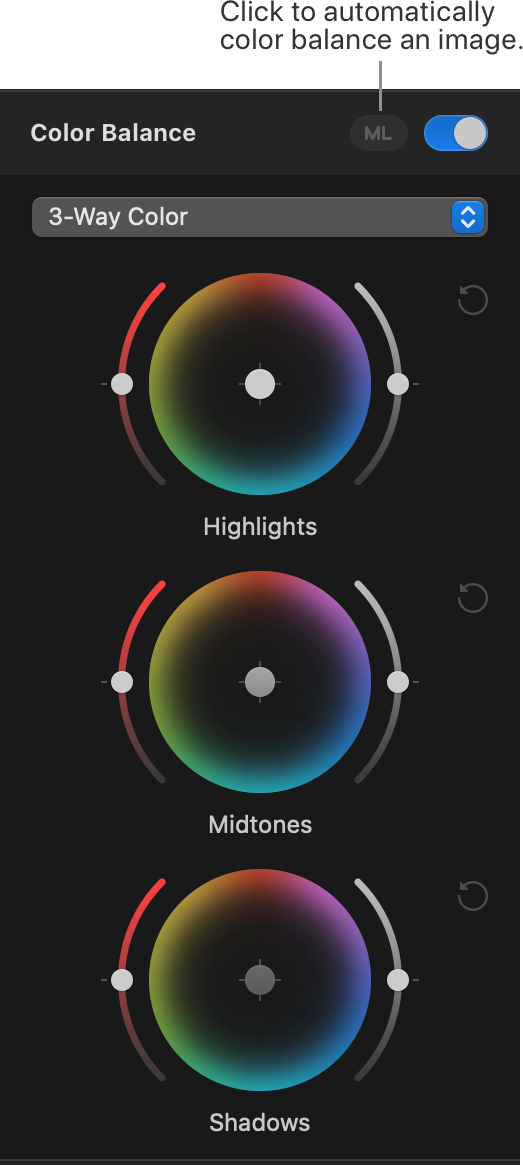
- Click 3-Way Color to add color tints to the shadows, midtones, and highlights individually. This is the best option for getting unique looks and lighting effects for your images.
To adjust the color balance:
- Drag the central point in the middle of the wheel towards a color at the edges to add more of that color to the shadows, midtones, or highlights (when using the 3-Way Color wheels) or the entire image (when using the Master wheel).
- Drag the brightness slider on the right to adjust the brightness of the colors in the shadows, midtones, or highlights (when using the 3-Way Color wheels) or the entire image (when using the Master wheel).
- Drag the saturation slider on the left to adjust the saturation of the colors in the shadows, midtones, or highlights (when using the 3-Way Color wheels) or the entire image (when using the Master wheel).
Show Original: Click the Show Original button or press + on your keyboard to see what the image looks like without any color adjustments.
Show Split Comparison: – click the Show Original button, press + on your keyboard, or force click the canvas.
To reset all Color Adjustments, click Reset at the bottom of the Color Adjustments pane.
Selectively balance the colors in an image using sliders
Click the Color Balance pop-up menu in the Tool Options pane to choose the tonal range (shadows, midtones, or highlights) that you’d like to edit.
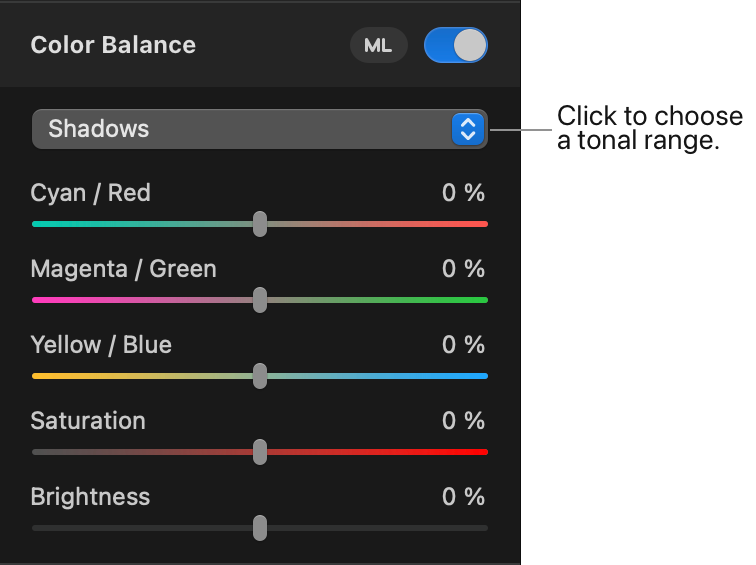
Drag the Red/Cyan, Green/Magenta, Yellow/Blue sliders to add to one color (while subtracting from the other).
Show Original: Click the Show Original button or press + on your keyboard to see what the image looks like without any color adjustments.
Show Split Comparison: – click the Show Original button, press + on your keyboard, or force click the canvas.
To reset all Color Adjustments, click Reset at the bottom of the Color Adjustments pane.
Automatically balance the colors in an image
Click ML next to the Color Balance adjustment to automatically balance the image colors.
Show Original: Click the Show Original button or press + on your keyboard to see what the image looks like without any color adjustments.
Show Split Comparison: – click the Show Original button, press + on your keyboard, or force click the canvas.
To reset all Color Adjustments, click Reset at the bottom of the Color Adjustments pane.


