Upgrade to Pixelmator Pro, the latest and greatest version of Pixelmator. Learn more

Have you ever seen those fancy photographs where the town and people look like a miniature model? This kind of effect is called “Tilt-shift photography”; it refers to a specific, soft, selective focus that makes photos look miniature. You can achieve this effect in two ways: using either a special photo camera lens or digital tools. The good news is that now you don’t have to buy a special photo camera or lens. You can achieve this effect in just a few simple steps.
Step 1
First, it is very important to choose the right image. Try to find an image from a good angle. The view must be from the top, e.g. photos of cityscapes, crowds, or sports fields work well. The photo can be taken from a helicopter, rooftop or bridge. Once you find a suitable image, open it in Pixelmator.

Step 2
Now, let’s create a new gradient. Click to create a new gradient in Gradients palette. It is very important to make this gradient correct. White colors should be in the edges, and dark gray and black colors should be added to the middle. Make darker colors more transparent by setting the Opacity in the Colors palette to 80-85%. However, leave 100% for a white color.Tip for beginner: you can add more colors to your gradient by Control-clicking the empty gradient slot and selecting “New Color Stop”.

Step 4
Once you have created a new gradient, choose Edit > Edit in Quick Mask Mode. Your image will be covered with a transparent red mask.

Step 5
Make sure that the new created gradient is selected. Holding down the Shift key on your keyboard (this will help to maintain the 180° angle), drag your mouse from the top to the bottom to create a gradient. You will notice that the red transparent mask will cover only the middle part of the image. However, make sure that this mask is not precisely in the middle, but just a bit lower.

Step 6
Again, choose Edit > Edit in Quick Mask Mode. Now your image should have two parts selected – a wider part on the top and a smaller on the bottom. If the selection does not look like our example, return to Step 4 and drag the gradient again. Proceed with Step 7 when you are completely satisfied with the selection.

Step 7
Once you have a perfect selection, double-click the Gaussian thumbnail in the Effects Browser (View > Show Effects Browser). Set Radius to 15-20 and click OK. Choose Edit > Deselect. Tip: You should set the Radius according to image size.

Step 8
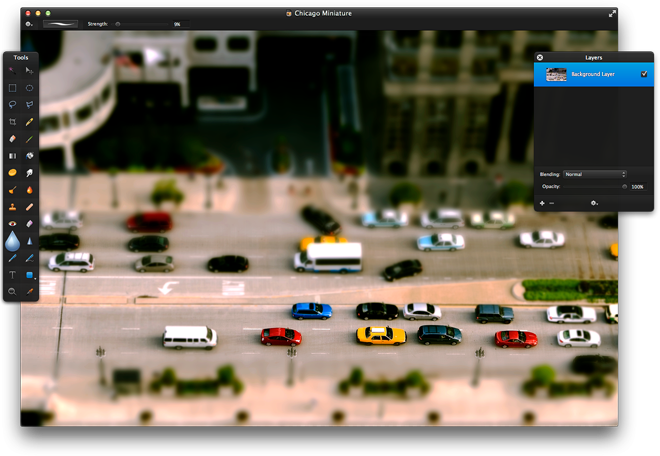
Now click to select the Blur Tool in the Tools palette. Use the Blur Tool to smooth the edges of the image. Make sure the Strength in the Tool Options bar is 100%. If you can’t see the Tool Options bar, choose View > Show Tool Options.

Step 9
To improve the effect, double-click the Levels thumbnail in the Effects Browser to bring up the color adjustment dialog. Play with the settings until you are satisfied with the effect.

Step 10
You’re almost done! Now for the colors. Miniature models are usually have bright, rich colors. If you’re editing an image of nature, the green color should be more prominent. In the Effects Browser, double-click the Color Balance thumbnail, and play with colors.

Conclusion
You’re finished! However, you can repeat Steps 4-6 to create a more blurry effect and play with Levels and Color Balance more if you wish. As you can see, creating the miniature model photo effect in Pixelmator is not as hard as it looks. Once you’ve learned how to make this effect, you can create as many miniature model images as you want!